- Data Hub Overview
- New Data Hub Features
- Accessing Data Hub for Moodle 2
- Data Hub Configuration
- Importing/Processing Files
- Viewing Logs
- Accessing the Import, Export, and Log Folders Via SFTP
- Setting Up User Import Files
- Importing Course Information
- Importing Enrollment Information
- Exporting Grade Information from Moodle via DH
- Importing very large user and enrollment files:
- Automating Data Hub
- Full list of actions and required fields for each
Data Hub 2.0
Accessing the Import, Export, and Log Folders Via SFTP
This page will demonstrate how to access the Data Hub import, export, and log folders via SFTP. There are two examples, one for Windows and one for MacOS.
WinSCP will be used to access the folders via SFTP in this example. The following link has a free WinSCP download, http://winscp.net/eng/index.php.
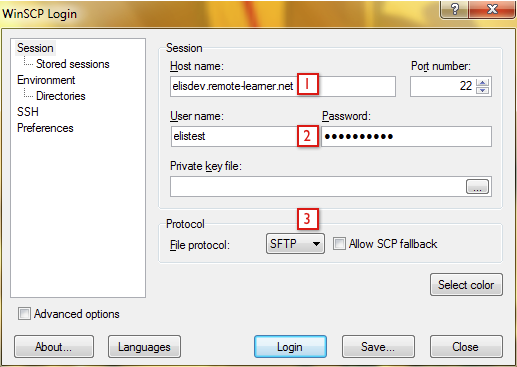
The WinSCP login screen is shown in the next image. To login and access the Data Hub file locations you will need to:
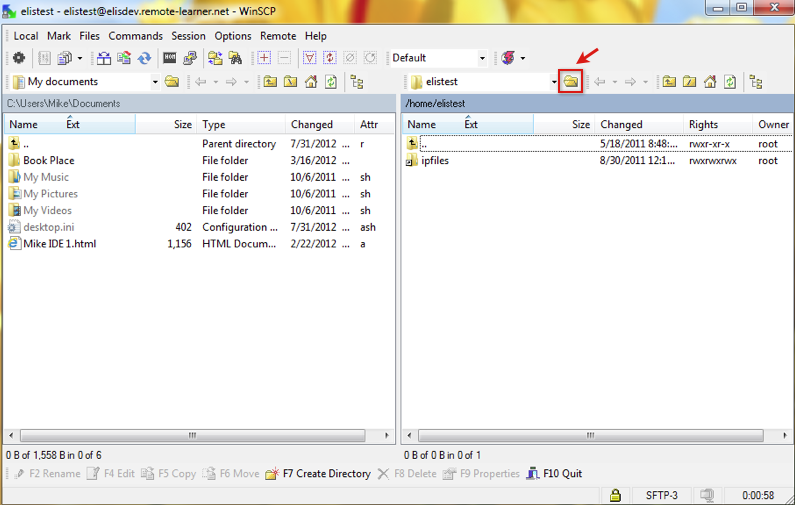
Once logged in the DH folders must be located. Select the folder icon as shown in the following image to enter the file path in the Open Directory window.
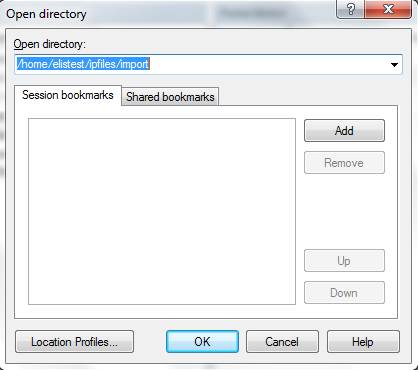
The file paths are located on the Data Hub block configuration screens. Go to Administration block > Site Administration > Plugins > Local plugins > Data Hub plugins > Version 1 import and Version 1 export. The file paths are setup by Remote Learner.
Enter the file path in the open directory window.
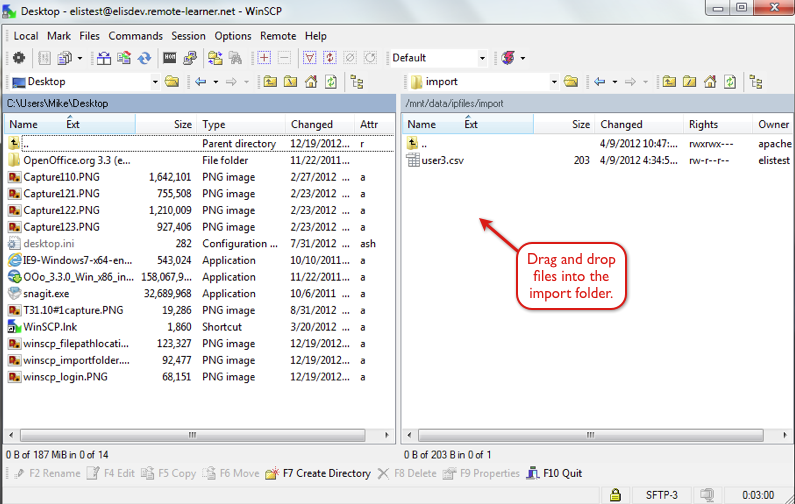
The next screen is showing the import folder on the right hand side of the image. From this screen you can drag and drop files into the import folder. When files are dragged and dropped into the folder or out of the folder they will be copied to the new location.
Cyberduck will be used to access the folders via SFTP in this example. The following link has a free Cyberduck download, http://cyberduck.ch/.
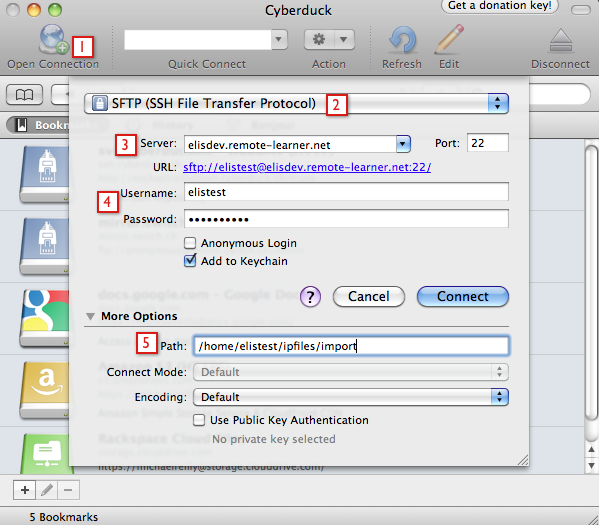
The Cyberduck login screen is shown in the next image. To login and access the Data Hub file locations you will need to:
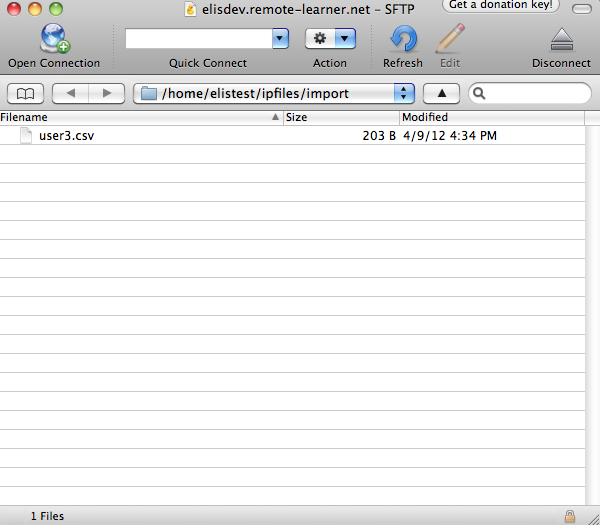
Once the correct folder is opened files can be copied to the folder location by dragging and dropping them into the folder. When files are dragged and dropped into the folder or out of the folder they will be copied to the new location. Files in the folders can also be copied to your local system by double clicking on the files.
Windows Access
WinSCP will be used to access the folders via SFTP in this example. The following link has a free WinSCP download, http://winscp.net/eng/index.php.
The WinSCP login screen is shown in the next image. To login and access the Data Hub file locations you will need to:
- Enter the host name or server address.
- Enter a username and password for accessing the Data Hub folders via SFTP. Remote Learner will setup the username and password.
- Make sure SFTP is selected from the file protocol drop down menu.

Once logged in the DH folders must be located. Select the folder icon as shown in the following image to enter the file path in the Open Directory window.

The file paths are located on the Data Hub block configuration screens. Go to Administration block > Site Administration > Plugins > Local plugins > Data Hub plugins > Version 1 import and Version 1 export. The file paths are setup by Remote Learner.
Enter the file path in the open directory window.
The next screen is showing the import folder on the right hand side of the image. From this screen you can drag and drop files into the import folder. When files are dragged and dropped into the folder or out of the folder they will be copied to the new location.

MacOS Access
Cyberduck will be used to access the folders via SFTP in this example. The following link has a free Cyberduck download, http://cyberduck.ch/.
The Cyberduck login screen is shown in the next image. To login and access the Data Hub file locations you will need to:
- Select the open connection plus (+) symbol.
- Make sure SFTP is selected from the file protocol drop down menu. This can be configured as the default setting.
- Enter the server address, e.g., elisdemo.remote-learner.net.
- Enter the username and password for accessing the Data Hub folders via SFTP. Remote Learner staff will setup the username and password.
- Enter the file path. The file paths are located on the Integration Point block configuration screen. Go to Administration block > Site Administration > Plugins > Local plugins > Data Hub plugins > Version 1 import and Version 1 export. These file paths are setup by Remote Learner staff.

Once the correct folder is opened files can be copied to the folder location by dragging and dropping them into the folder. When files are dragged and dropped into the folder or out of the folder they will be copied to the new location. Files in the folders can also be copied to your local system by double clicking on the files.
