Data Hub 2.0
A manual for Integration Point Basic for Moodle 2
- Site:
- Learning Spaces
- Course:
- Data Hub Version 1 for Moodle™ & LP LMS
- Book:
- Data Hub 2.0
- Printed by:
- Guest user
- Date:
- Friday, January 9, 2026, 7:46 PM
Table of contents
- Data Hub Overview
- New Data Hub Features
- Accessing Data Hub for Moodle 2
- Data Hub Configuration
- Importing/Processing Files
- Viewing Logs
- Accessing the Import, Export, and Log Folders Via SFTP
- Setting Up User Import Files
- Importing Course Information
- Importing Enrollment Information
- Exporting Grade Information from Moodle via DH
- Importing very large user and enrollment files:
- Automating Data Hub
- Full list of actions and required fields for each
Data Hub Overview
Data Hub for Moodle 2:
The documentation in this book is for using Data Hub with Moodle. For ELIS Data Hub documentation select the following link.
What is Data Hub?
Data Hub is a general tool for importing and exporting user/course/enrollment information, on a schedule, via CSV files. This is a common method for integrating SIS/HR/ERP/MIS systems with an LMS.
What DH does not do:
Data Hub does not include a set of SIS specific plug-ins; using DH requires that you can export CSV files from your SIS in a format that DH can process (see the sections on setting up user, course, and enrollment fields for specifics of the DH CSV format). The DH format is very similar to the format required for Moodle's standard flat file import.
Moodle is a powerful system for delivering courses, however there are often times when users need to integrate with information from other systems such as SIS, EPR, HR, and Financial Record keeping systems. To facilitate this, Remote Learner has built the Data Hub, a tool for 2 way communication of information between Moodle and other systems - users, courses, enrollments in and grades out. DH also provides a way to quickly setup Moodle courses by uploading a formatted CSV file and using template courses. Detailed logs are kept of import jobs, which can be viewed online and/or emailed to designated recipients.
Update Frequency:
Inbound information (to Moodle):
Incoming information (users, user information, enrollments, courses, etc.) can be scheduled in minutes, hours, or days. You can run more than one schedule, for example to import users every 5 minutes and to import enrollments every hour. Import and export jobs can be scheduled in the Data Hub Plug-in Configuration as described on the Data Hub Block Configuration page of this manual.
Outbound information (from Moodle):
Grade and course information is exported every 24 hours by default. This can be changed in the Data Hub Block settings.
Data format(s):
The current version of Data Hub provides for import of CSV (comma separated values) files - a common format that can be easily created and/or edited in most data management tools (including Excel, OpenOffice, Access, etc.).
Data Categories:
User data- this is data about the user, that includes some or all of the information that goes in the user profiles in Moodle. See below for a detailed description of the user data handling in DH Basic.
Course data- this is data about course properties that may be set by the data import. See below for a detailed description of these properties.
Enrollment properties- this is data about the enrollment status of a user - which courses the user is enrolled in, what their status is, what their role in the class is, the completion status for their courses, etc. See below for a detailed description of these properties.
Automating Data Import/Export:
Data Hub can be scheduled to automatically import files placed in it’s import folder and load any new files that are placed there into Moodle. If your source data system (SIS/ERP/HRMS, etc.) can be setup to automatically export files, it can send them to the DH target folder in various ways – for instance via SCP, shell scripts, etc.
Since source systems are all different, we can’t guarantee that a particular client system can be fully automated, but if it can be set to automatically export CSV files, then it is generally a simple matter for the system's administrator to set it to automatically export those files to the Data Hub Basic target folder. Once that is done, Data Hub will load the files as scheduled.
We work with clients to help their system administrators setup their systems on an hourly basis, if necessary (cost will depend on the specific system, how well documented it’s export functions are, etc).
New Data Hub Features
1. There are new scheduling features for Data Hub 2.7.7.0+ and 2.8.5.0+. Data Hub now has an advanced scheduling option for importing and exporting files.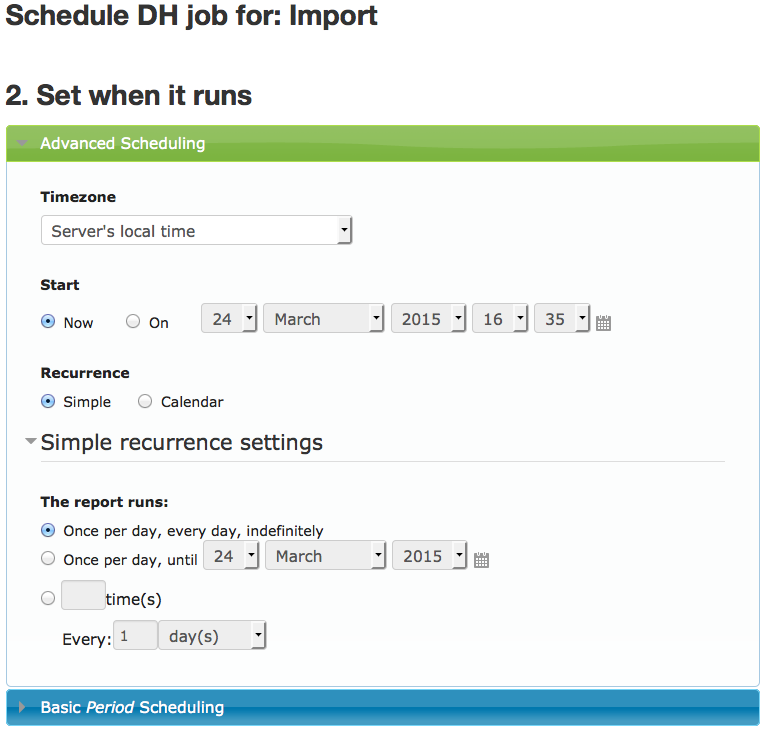
2. The identifying fields for users (idnumber, username, and email) can now be disabled or enabled in the Data Hub settings. Go to the Administration block > Site Administration > Plugins > Local plugins > Data Hub plugins > Version 1 import.
3. All user fields except idnumber can be updated now. For more information about updating identifying fields go to this page.
4. The location of Data Hub has changed. Go to the Administration block > Site Administration > Plugins > Local plugins > Data Hub plugins. For the Logs report go to the Administration block > Site Administration > Reports > Data Hub logs link. All Data Hub blocks will be converted to HTML blocks during upgrade to new version.
Accessing Data Hub for Moodle 2
Adding the Data Hub block to your site:
Data Hub can be accessed by going to the Administration block > Site Administration > Plugins > Local plugins > Data Hub plugins. Under the Data Hub plugins heading is a list of links to different areas of Data Hub.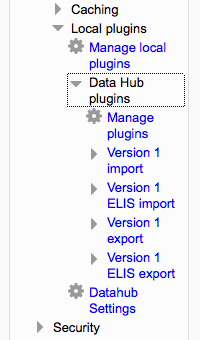
On the Manage Plugins screen use the Edit, Manage, and Go links to access ELIS Data Hub:
- Edit: Links to the settings screen.
- Manage: Links to the schedule wizard, for scheduling Data Hub jobs.
- Go: Links to a screen where files can be uploaded and run manually.
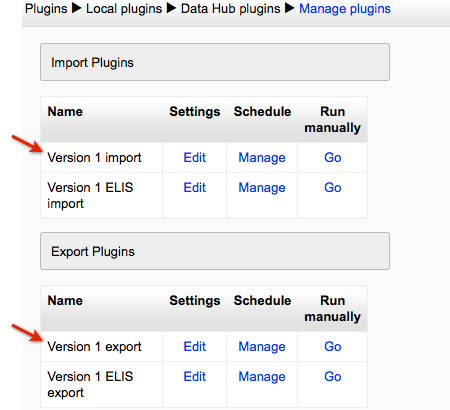
Version 1 import and export are for Data Hub Basic for Moodle. For ELIS Data Hub be sure to use the Version 1 ELIS import and export.
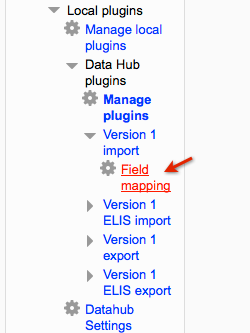
To access the field mapping screens go to the Administration block > Site Administration > Plugins > Local plugins > Data Hub plugins and select the arrow next to Version 1 import. After selecting the arrow a Field mapping link is shown, select it to open the Field mapping screen. Selecting the Version 1 import link will take you to the edit settings page.
Data Hub Configuration
To view the Data Hub Basic configuration go to the Site Administration menu and select Plugins > Local plugins > Data Hub plugins > Version 1 import link.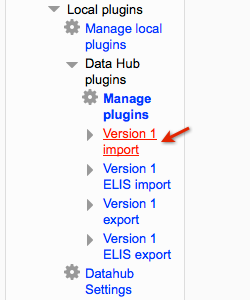
This opens the Version 1 import settings screen.
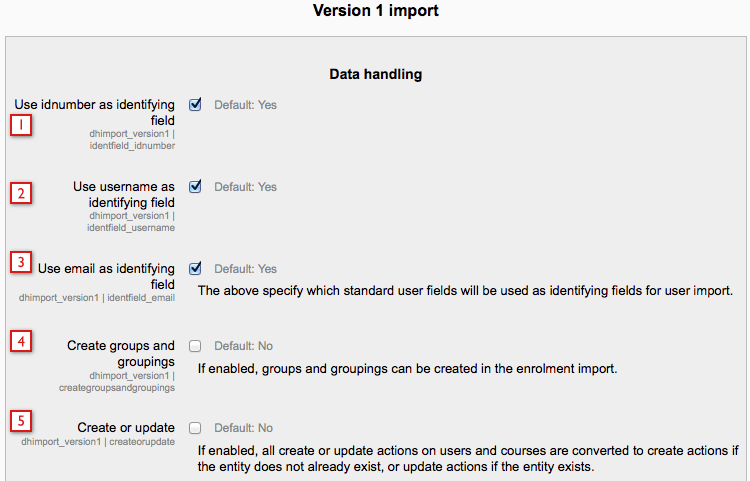
- Use idnumber as identifying field: This setting will be available in the next release.
- Use username as identifying field: This setting will be available in the next release.
- Use email as identifying field: This setting will be available in the next release.
- If this is selected then Data Hub will create create groups and groupings in Moodle courses users are enrolled in, if those groups and/or groupings are specified in the import file. If this is not checked then DH will still add users to groups and groupings as specified in the import file, but will not create groups/groupings if they don't already exist in the Moodle courses.
- If this is selected then when DH process an update action, it will create the user if the user being updated does not already exist. This is useful for SIS systems such as Datatel which can only do full dataset exports.
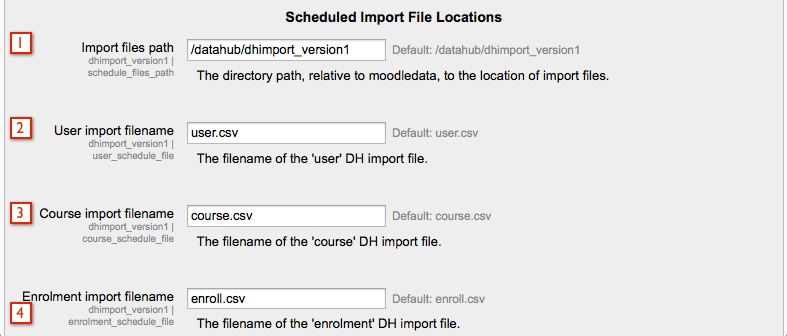
- This is the import file path - where DH will look for files. Please consult with RL Support before changing this path.
- This is the name of the import file name. For example if your SIS/HR system names files it exports mysystem.csv you can tell DH that this will be what the files are named.
- This is the same idea as above - setting a different name here will tell DH to look for a file with the name you set for course import files.
- Setting a different name here will tell DH to look for a file with the name you set for enrollment import files.
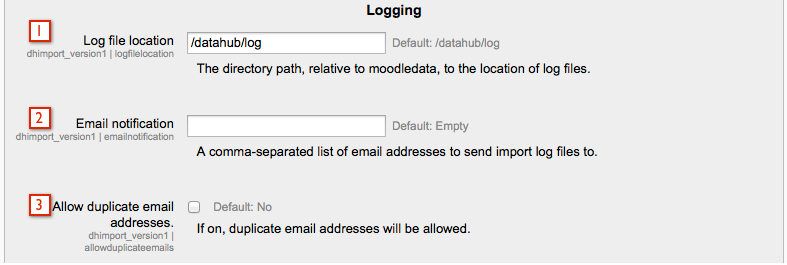
- By default Data Hub will place log files in /rlip/log in your data directory. This can be changed to a different location if you would prefer.
- You can enter email addresses in here for users to be sent the import logs. This is handy as it gives your System Admin a quick way to know that imports are working correctly and/or know if there are problems.
- This new Data Hub setting allows duplicate email addresses when enabled.
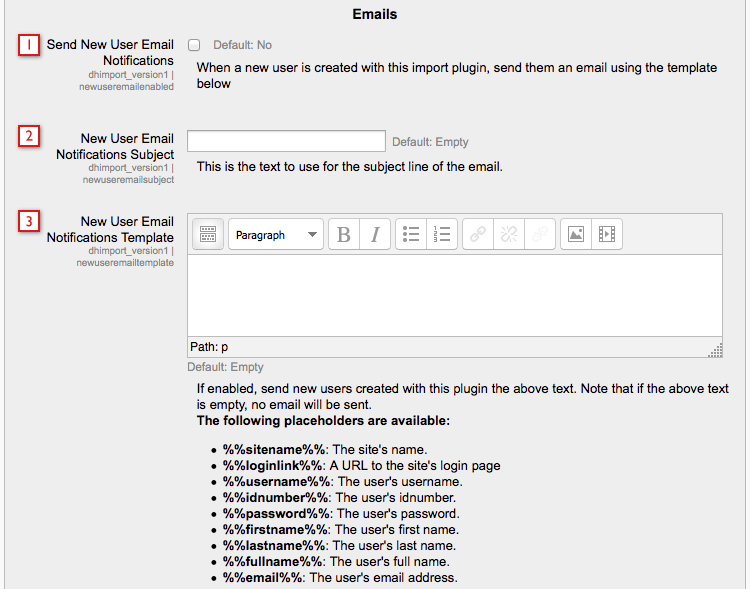
- Send New User Email Notifications: Email notifications will be sent to new users.
- Send User Email Notifications Subject: Enter the subject for the email.
- New User Email Notifications Template: Enter the content for the email. For example: %%firstname%% %%lastname%% an account has been created for you at %%sitename%%. Your username is %%username%% and your password is %%password%%. %%loginlink%%.
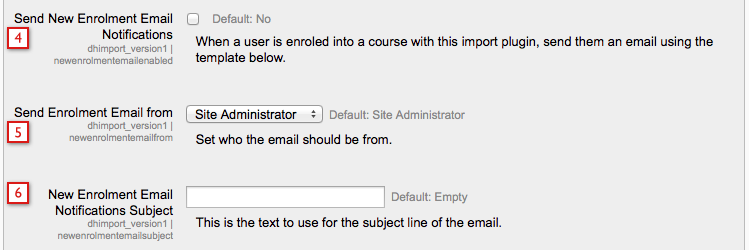
- Send New Enrollment Email Notifications:
- Send Enrollment Email from:
- New Enrollment Email Notifications Subject:
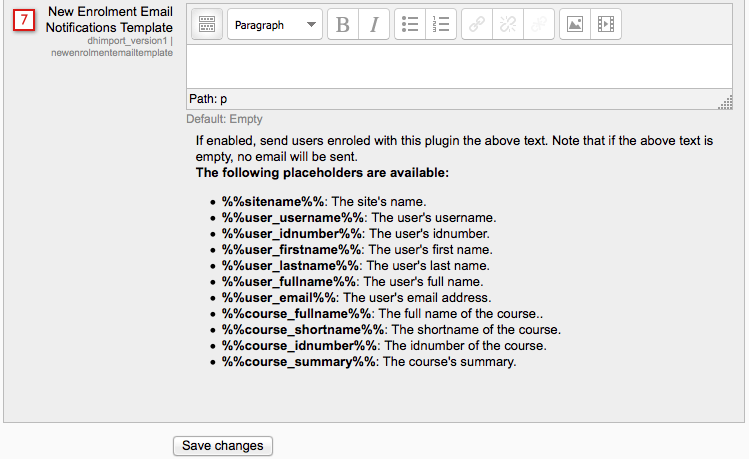
- New Enrollment Email Notifications Template:
Importing/Processing Files
Data Hub import files can be scheduled to process or can be manually processed. Import files should be scheduled to process in most instances. Manual processing should be used for testing small files only. Manual processing is currently limited to 28 seconds of processing time in our standard Data Hub installs. Scheduled processing will continue imports on subsequent cron runs when processing takes to long, manual processing does not do this.Scheduling Import Times
Scheduled imports process files uploaded to the the import files path, which is also referred to as the import file location in some areas of the documentation. The files can be uploaded to the import files path via SFTP. The import files path is listed in the Administration block > Site Administration > Plugins > Local plugins > Data Hub plugins > Version 1 import settings.
To schedule your imports, click the Manage link under the Schedule heading.
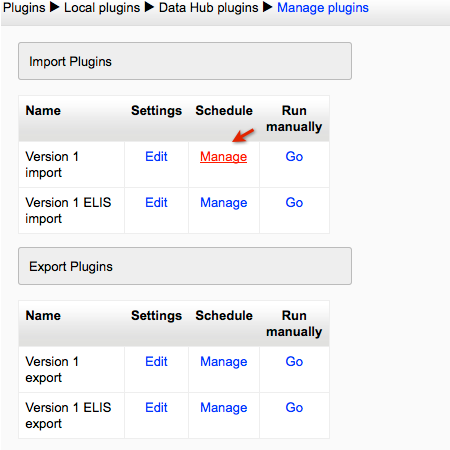
This will open up the scheduling wizard. Click the New job button to create a new job. A single site can run more than one scheduled import/export job.
The schedule defines the earliest time a job can run, but the jobs themselves may run a few minutes later than the scheduled times.
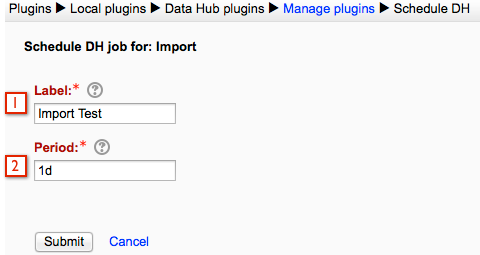
- First we'll need to give our job a label - this lets us tell what the different jobs we have scheduled do, so it's ideal to use a label that will make it easy for you to tell what the job is for.
- Period - this is the frequency the job will run. Import date format: The are 3 import date formats, whichever format is selected here must be used in the import files. This value should be set in the format *d*h*m with 1d = once per day. 1 h= once per hour, and 5m = every 5 minutes. For example, you set your schedule to 2d the this job would run every two days from the time you set the schedule up. If you set it at 2h, then the job would run every two hours from the time you set the schedule up. If you set it to 30m, the import will run every 30 minutes starting from the time you set the schedule up.
There are new scheduling features for Data Hub 2.7.7.0+ and 2.8.5.0+. Data Hub now has an advanced scheduling option.
There are two steps to schedule a Data Hub job with the new improvements. The first step is to enter a Label for the job.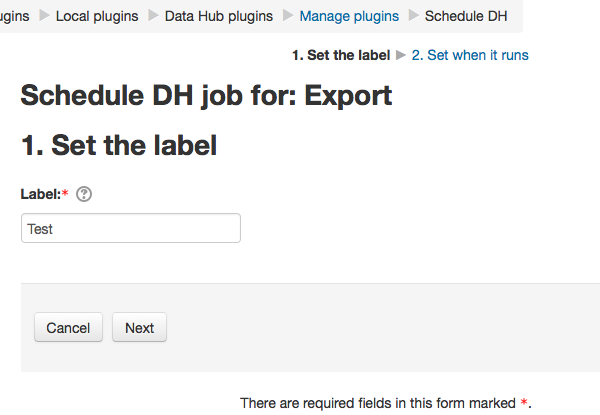
Step 2 sets when the job runs. There are two options, advanced scheduling and basic period scheduling. Basic period scheduling is the type of scheduling used in Data Hub versions prior to 2.7.7.0 and 2.8.5.0. Advanced scheduling is the new feature shown below.
There are two types of recurrence settings for advanced scheduling, simple and calendar. Select which one you will be using as shown in the next image. Each recurrence has different settings, so the settings will change depending on which recurrence you select.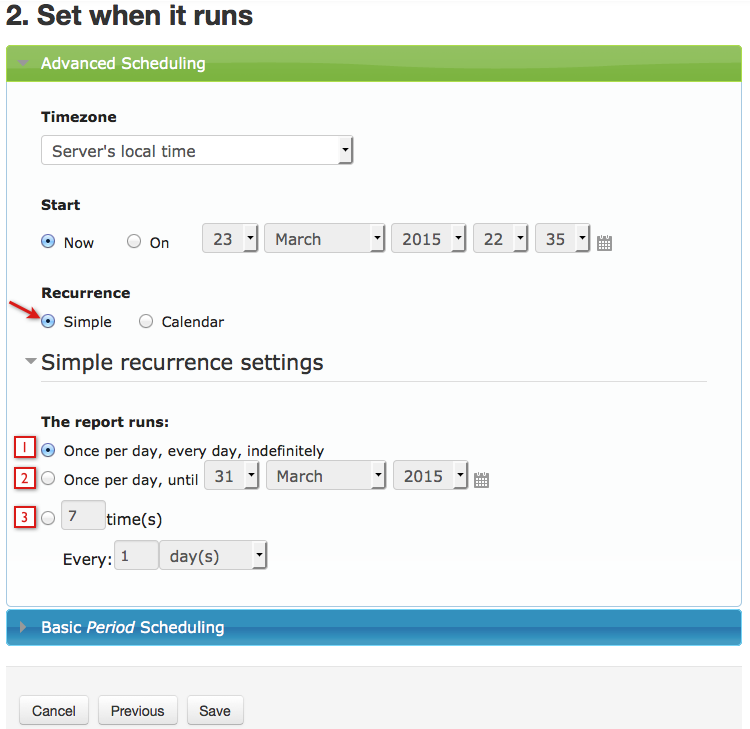
- Select this to run the report once a day indefinitely.
- Select this to run the report once a day until the date selected.
- Select this to run the report a certain number of times at one of four intervals - minutes, hours, days, or months. In the example shown in the image above this setting will run the report once a day for 7 days.
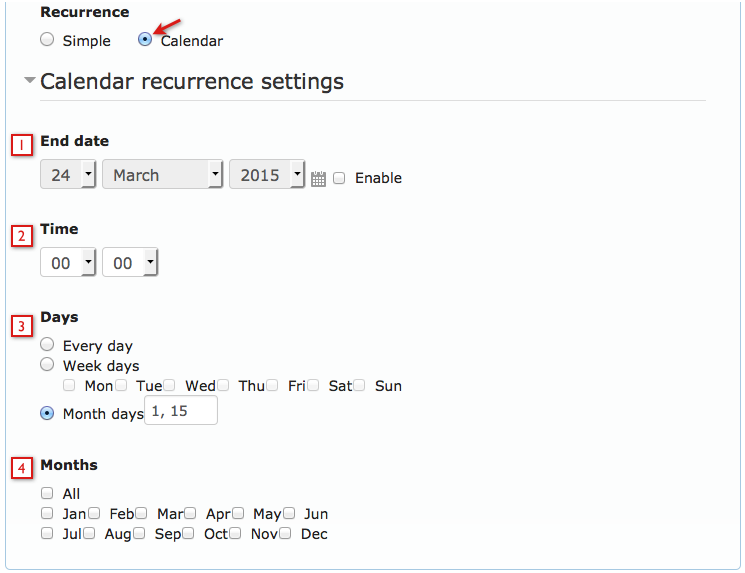
- End date: Select the date when the report should stop running. Select the Enable checkbox to enter an end date.
- Time: Use the drop downs to enter the time. The hours drop down uses a 24 hour format. For example, 16:55 is 04:55 PM.
- Days: select whether the report runs every day, only on specific week days, or specific month days.
- If week days is selected, select which days.
- If Month days is selected, enter a number for the day of the month the report should run. For example, 15 for the 15th.. If the report should run on more than one month day, enter day numbers separated by commas.
- Months: Select the months in which the report runs. For example, if the report is scheduled to run on January and July only, and the Month days is set to 15, then it runs on January 15 and July 15. If the report was set to run every Friday (in the Week Days) then it would run every Friday in July and January.
Note: If you need to have the import run at a specific time, RL Support can setup a custom serverside cron job to support that for Enterprise and Premiere support levels.
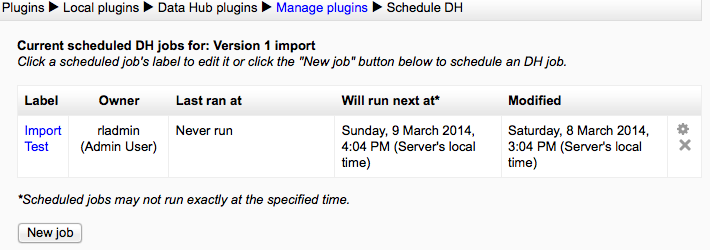
Once the schedule has been set, your job will begin running based on the time period. In the example above, the job was created at 8/March/2014 at 3:04 PM and is scheduled to run once a day. The import will run the first time on 9/March/2014 after 3:04 PM and every day after that until the job is deleted.
Finally, you can test your files by running them manually in Data Hub 2.
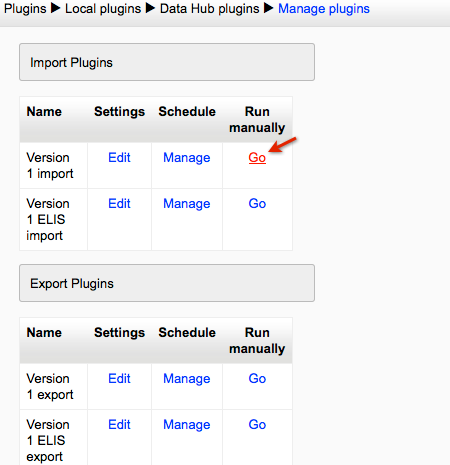
To run Data Hub manually, click the Go link under the Run Manually heading.
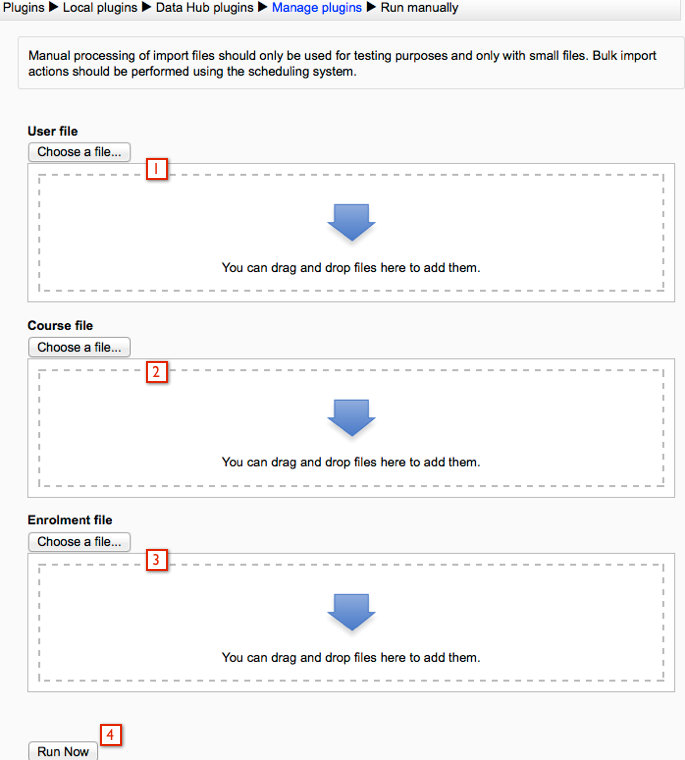
- Choose a file with user information in it to import manually.
- Choose a file with course information in it to import manually.
- Choose a file with enrollment information in it to import manually.
- Run now button.
Viewing Logs
Data Hub Logs:
Data Hub for Moodle 2 now includes a log page where you can view the logs from your imports and exports. Go to the Administration block > Site Administration > Reports > Data Hub logs.The log viewing screen provides the ability to filter what logs you see, to view summary information about success and failure of import and exports, and the ability to download and view the full logs.
Logs can also be viewed via SFTP if you have setup the SFTP folder. At midnight, 12:00am, the logs for the day are compressed into one zip file with a date stamp.
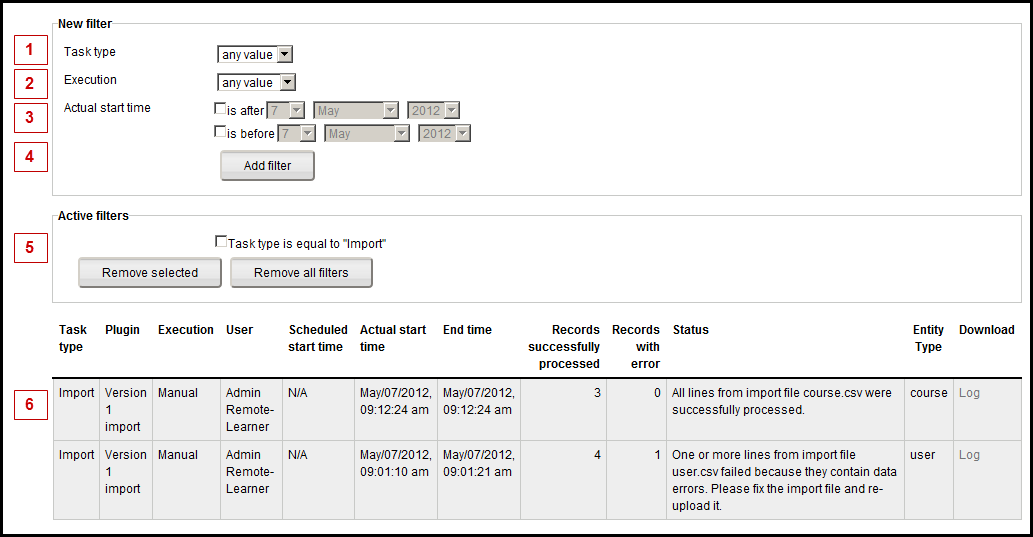
- The filter settings enables you to hide or show logs with certain parameters.
- The Task Type filter lets you show only import or only export logs.
- The Execution filter lets you choose between showing automatic imports only, or manual imports only.
- The start time filter lets you show logs for actions that occurred on specific dates.
- Active filters will show you what filters are currently being used to filter the logs you see.
- The log list shows you summary information about logs for import and/or export events.
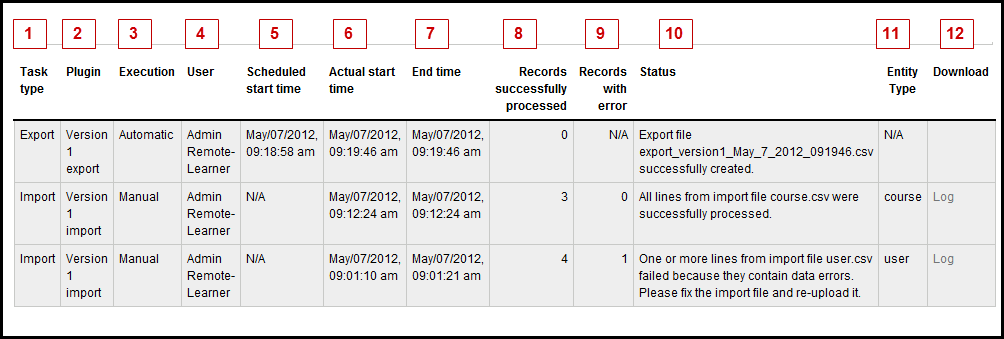
- The first row shows the type of task - Import or Export.
- This shows the plug-in type.
- This shows whether the file was run automatically, or manually.
- This shows which user ran the file - this may vary when tasks are run manually.
- This shows when the file was scheduled to run - for the manual files in this example, this is not applicable as the files were run manually and not scheduled.
- This shows when the file began processing.
- This shows when the file completed processing - very large files (10,000 lines or more) may take some time to run - running such files manually can help you plan how long a large file is likely to take.
- This will show how many records were processed - for example if there were 3 courses in a course creation/update file, this shows that they were all processed. Note that in teh import file that ran at 09:01 AM above, 4 records processed ok, and one had an error.
- This shows how many records had an error and could not be processed. Note that a file with 100 records and 50 errors, 50 records are processed (courses created, users created, etc.) and 50 were not. The log show this in detail what happened.
- The Status message presents a summary of the Data Hub run.
- The Entity type column shows what kind of file was run - user, course, enrollment, etc.
- This is the link to the full log file. Since export files just export completion information, there is no detailed log of these files.
Viewing the logs online:

Click the Log link to view the complete, line by line log of the import action.

The detailed log is a text file, when you view it in a text editor you can see the line by line log and identify why errors occurred. For example in the above file you can see that the 3rd line a user with test4 for a user name was created, and then in the 4th line the same user name was rejected as there is already a user with that user name in the system (in this case the user created on line 3).
Accessing the Import, Export, and Log Folders Via SFTP
This page will demonstrate how to access the Data Hub import, export, and log folders via SFTP. There are two examples, one for Windows and one for MacOS.Windows Access
WinSCP will be used to access the folders via SFTP in this example. The following link has a free WinSCP download, http://winscp.net/eng/index.php.
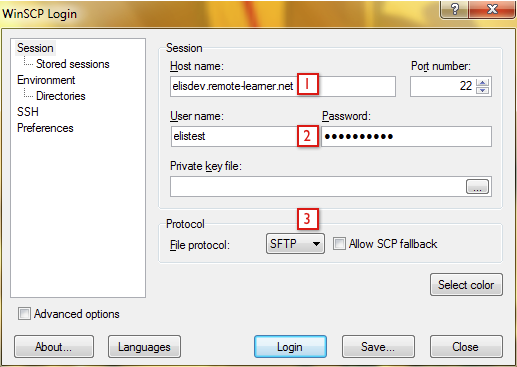
The WinSCP login screen is shown in the next image. To login and access the Data Hub file locations you will need to:
- Enter the host name or server address.
- Enter a username and password for accessing the Data Hub folders via SFTP. Remote Learner will setup the username and password.
- Make sure SFTP is selected from the file protocol drop down menu.
Once logged in the DH folders must be located. Select the folder icon as shown in the following image to enter the file path in the Open Directory window.
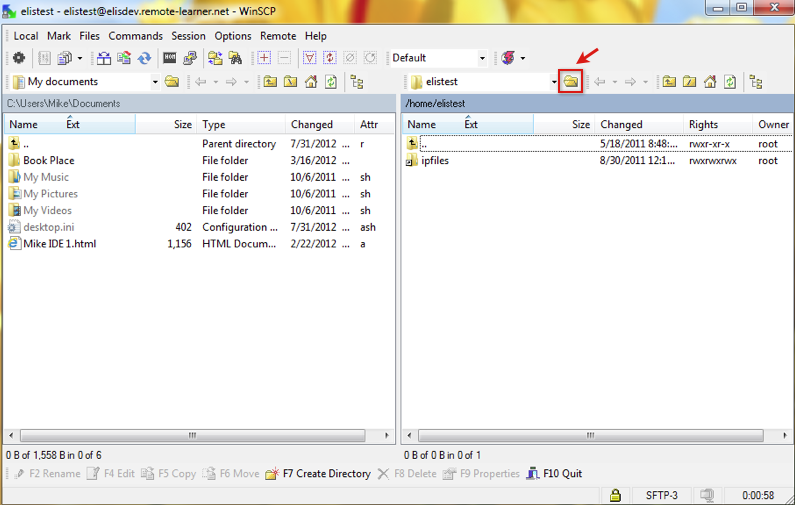
The file paths are located on the Data Hub block configuration screens. Go to Administration block > Site Administration > Plugins > Local plugins > Data Hub plugins > Version 1 import and Version 1 export. The file paths are setup by Remote Learner.
Enter the file path in the open directory window.
The next screen is showing the import folder on the right hand side of the image. From this screen you can drag and drop files into the import folder. When files are dragged and dropped into the folder or out of the folder they will be copied to the new location.
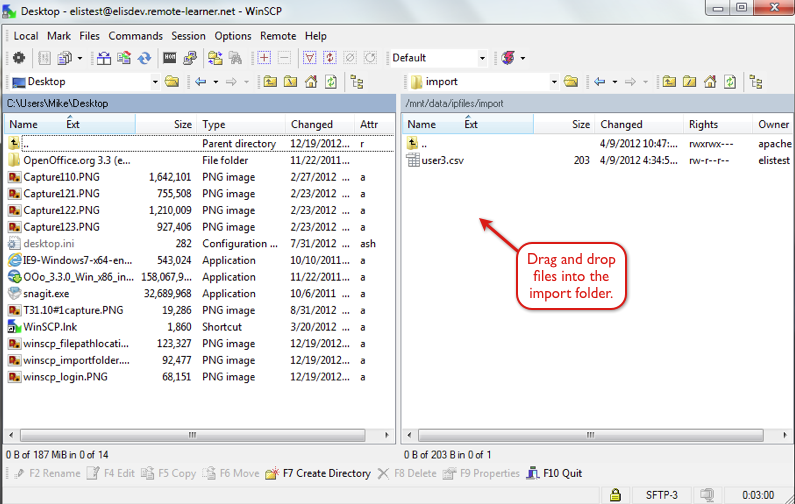
MacOS Access
Cyberduck will be used to access the folders via SFTP in this example. The following link has a free Cyberduck download, http://cyberduck.ch/.
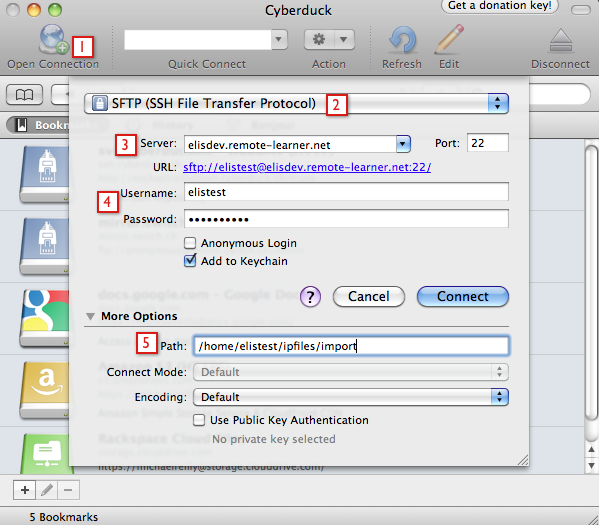
The Cyberduck login screen is shown in the next image. To login and access the Data Hub file locations you will need to:
- Select the open connection plus (+) symbol.
- Make sure SFTP is selected from the file protocol drop down menu. This can be configured as the default setting.
- Enter the server address, e.g., elisdemo.remote-learner.net.
- Enter the username and password for accessing the Data Hub folders via SFTP. Remote Learner staff will setup the username and password.
- Enter the file path. The file paths are located on the Integration Point block configuration screen. Go to Administration block > Site Administration > Plugins > Local plugins > Data Hub plugins > Version 1 import and Version 1 export. These file paths are setup by Remote Learner staff.
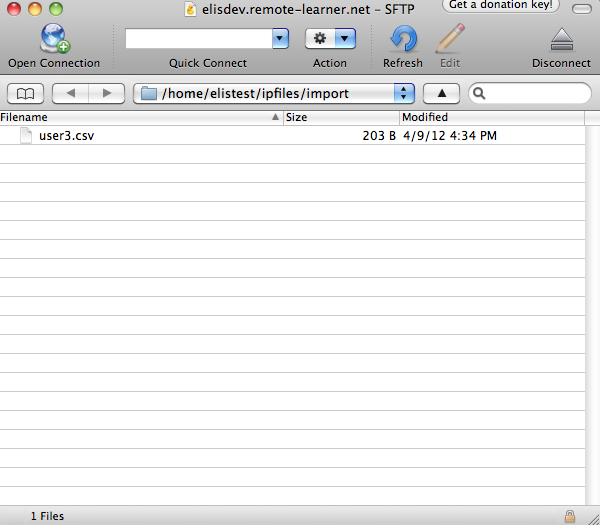
Once the correct folder is opened files can be copied to the folder location by dragging and dropping them into the folder. When files are dragged and dropped into the folder or out of the folder they will be copied to the new location. Files in the folders can also be copied to your local system by double clicking on the files.
Setting Up User Import Files
Setting up Import Files:
The fields that can be imported and exported are listed in the Field Mappings link. Go to the Administration block > Site Administration > Plugins > Local plugins > Data Hub plugins > Version 1 import > Field mapping.
The user properties mapping table enables you to map the names of user properties from your export file to properties in Data Hub.
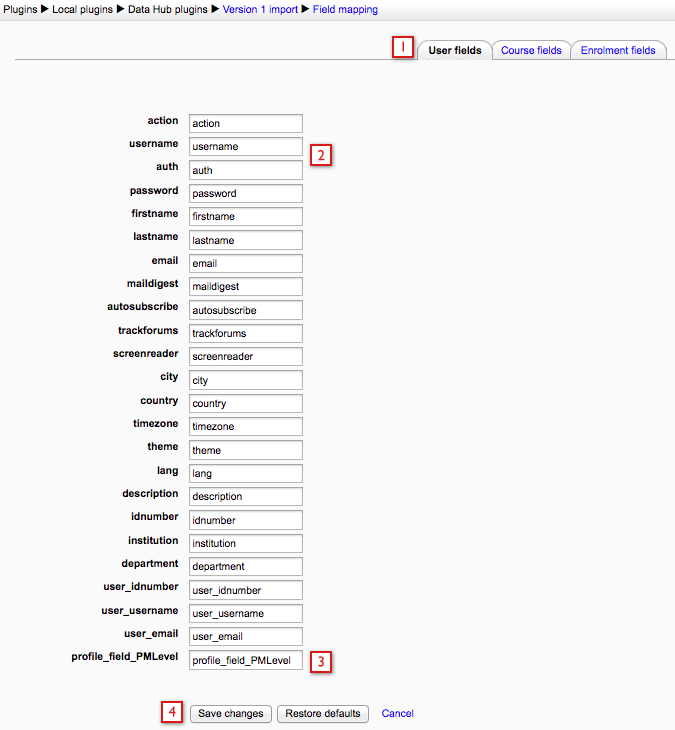
- The tabs at the top indicate which fields we are editing - in this example the User Fields.
- DH enables you to enter new values for these fields to match the values in your export file. For example if your backend system calls the username the uname, you can map the Moodle field username to uname here. The most common use here is to remap profile field values (see below).
- User profile fields added to the site are at the bottom of the list.
- Save changes to save your changes and put them into effect.
Changing the names of the Custom Profile fields in your export file:

An example of the use of a common use of the field mapping interface is to match the import field names in the import file with the Moodle field names for custom profile fields. Since Moodle uses the profile_field_name format, DH's field mapping enables you to send Moodle "Company" from your backend system and DH will map that to Moodle's profile_field_Company format.
Moodle custom user profile fields will be on the users property map. In DH Basic, the custom user profile fields all start with "profile_field_" then the shortname of the custom field, but this can be configured in the user property map.The following page has additional information about using custom profile fields.
The properties that can be set via the user csv files are listed below with brief descriptions:
| action |
The action field is always required. Enter create, update, or delete for this field. The actions from Data Hub 1 will work with Data Hub 2, "add" can be used instead of "create" and "disable" can be used instead of "delete". |
| auth: | Enter the user authentication type here. The example below this chart has more information. |
| username: | Username is a required field for user creation. This field is an optional identifying field, which are fields used to identify users for updating/deleting. For example, when updating a user I can include the action field, this field, and then add the fields that should be updated. This identifying field can be updated now. |
| password: | Password is a required field for user creation. |
| email: | Email is a required field for user creation. This field is an optional identifying field, which are fields used to identify users for updating/deleting. For example, when updating a user I can include the action field, this field, and then add the fields that should be updated. This identifying field can be updated now. |
| firstname: | Firstname is a required field for user creation. |
| lastname: | Lastname is a required field for user creation. |
| city: | City is a required field for user creation. |
| country: | The country name should be entered as it would in Moodle, e.g., United States. |
| maildigest: | Enter no digest, complete, or subjects. |
| autosubscribe: | Enter yes or no. |
| trackforums: | Enter yes or no. |
| timezone: | The user's timezone. |
| language: | Check the Moodle site for the appropriate entries, use the shortname shown in parentheses. For example, English (en_us). |
| Description |
Descriptive text about the user can be entered here. |
| theme: | Enter the shortname of the theme. |
| screenreader: | Enter yes or no. |
| description: | Enter text. |
| idnumber |
An idnumber from an external system. This field is an optional identifying field, which are fields used to identify users for updating/deleting. For example, when updating a user I can include the action field, this field, and then the fields that should be updated. The idnumber field can not be updated, once the idnumber field is set it can not edited with Data Hub. |
| institution: | This is an optional field, located in the Optional section of the Moodle user profile. |
| department: | This is an optional field, located in the Optional section of the Moodle user profile. |
| user_idnumber: | The idnumber of an existing user. This can be used as an identifying field. If this field and the idnumber field are in the file, both values have to be the same because the idnumber can not be changed once set. |
| user_username: | The username of an existing user. This can be used as an identifying field. If this field and the username field are present in the file, this will be the identifying field and the username field can then be used for updating. |
| user_email: | The email of an existing user. This can be used as an identifying field. If this field and the email field are present in the file, this will be the identifying field and the email field can then be used for updating. |
| profile_field_fieldname: | This is a custom profile field for the site. For this entry, enter "profile_field_fieldname" in the header, then add a value for this profile field in the column for the user. |
Authentication (auth): Follow the steps below to find the value that should be entered for different authentications. This is not a required field, if a value is not entered then the default authentication will be used.
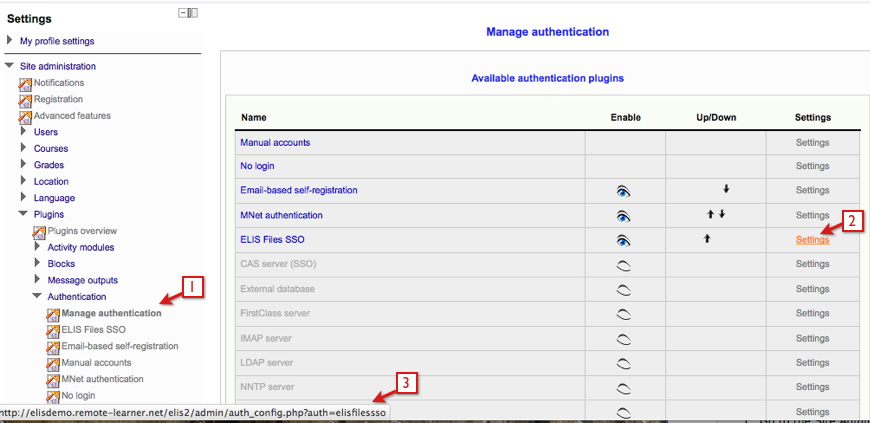
- Go to Site Administration > Users > Authentication > Manage Authentication.
- Mouse over (do not click) the Settings link of the authentication type, this will display the url shown in step 3.
- The end of the url displays the name that should be entered as a value in the csv file, for example, "elisfilessso" should be entered for the ELIS Files SSO authentication.
| Authentication Names | CSV Entries |
| Manual accounts | manual |
| No login |
nologin |
| Email-based self-registration | email |
| MNet authentication | mnet |
| ELIS Files SSO | elisfilessso |
| CAS server | cas |
| Curriculum Management System Authorization | crlm |
| External database | db |
| FirstClass server | fc |
| IMAPserver | imap |
| LDAP server | ldap |
| NNTP server | nntp |
| No authentication | none |
| OpenID | openid |
| PAM (Pluggable Authentication Modules) | pam |
| POP3 server | pop3 |
| Radius server | radius |
| Shibboleth | shibboleth |
Required Fields
The required fields for creating new users are:
- action - the action field should always be listed first in the file
- username
- password
- firstname
- lastname
- city
- country
For updating/deleting users the action field and one of the following three identifying fields are required:
- username
- idnumber
Note: Username and email identifying fields can be updated now, the idnumber field can not be updated with Data Hub once it is set.
Data Hub Actions
DH tells Moodle what needs to be done with imported data via the Actions column. The following actions can be performed for users:
- create - create a user. Data Hub 1 uses "add" as the action, that will still work with Data Hub 2.
- update - update a user
- delete - this deletes the user and all of their data. Data Hub 1 used "disable" as the action, that will still work with Data Hub 2.

Select this link to download the sample CSV file used in the example above for creating/updating/deleting users.
The first column of the file contains the action field, which tells Data Hub to create, update, or delete the user. In the file the first two users are being created on the site. The third user is being updated. The fourth user is being deleted, which will delete the user and their records. The actions column enables DH to provide incremental updates, as well as enabling the updating or deleting of users via the automated process.
Password entries are required for creating users. If a user's password entry does not conform to your site's password policy the user will not be created.
User.csv file FAQ:
- What if we send an empty file (no actions in that time period)?
You will get an error saying that the file was empty, no users will be updated, changed, or deleted. - What does it mean to “disable” a user?
Disabled users are deleted from the system. - How is the “add or update user” feature different than doing our own LDAP authentication?
Data Hub supports user fields (such as custom profile fields) that are not supported by Moodle's LDAP plug-in.
* Requires that User themes are enabled in the Admin/Appearance settings of Moodle
Updating User, Course, and Enrollment Information
Updating with Data Hub:
When updating accounts, you don't need to have as much information in your CSV file as you do when creating accounts. The required information for each entity is described in the following table.
| Updating: |
Required |
Notes |
| Users |
username or email or idnumber |
You only need one of these identifying fields to update a user. Note that idnumber field can not be updated, the username and email fields can be updated now, see details below. |
| Courses |
shortname |
You only need the Moodle course shortname to update a course. |
See the Full list of actions and required fields for each page below for more detailed information on what commands to use for creating/updating/deleting items and enrollments.
Updating User Identifying Fields
The username and email field can be updated. The idnumber field can not be updated once it has been set. There are a couple of ways to update these fields, the following use cases will demonstrate different ways to update the email field.
Use Case 1
For this example we will use the Data Hub settings to update a users email. Go to the Administration block > Site Administration > Plugins > Local plugins > Data Hub plugins > Version 1 import. The following image shows the screen that will open. Deselect the checkbox that controls whether the email address is used as an identifying field.
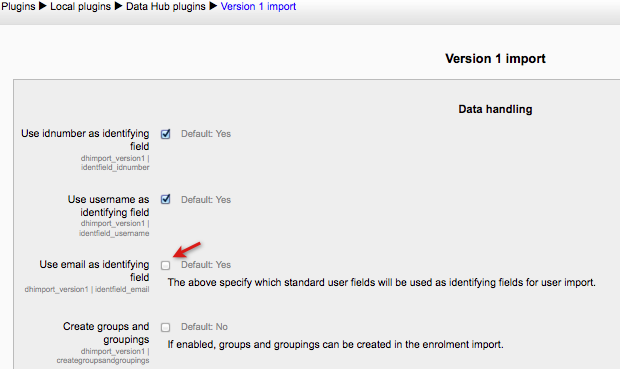
Now email addresses can be updated in user import files, but the email address can no longer be used as an identifying field. The following image shows an example of a user import file for updating a user's email. The 'idnumber' field is the identifying field and the 'email' field is being updated.

It is possible to keep the email field as an identifying field and update the email field, that is demonstrated in Use Case 2.
Use Case 2
For this second use case we will use the new fields added to the Version 1 import user field map. In this use case we do not need to edit the Data Hub settings for identifying fields, all three identifying fields are active in this use case. The following image shows the bottom of the User field map located in the Administration block > Site Administration > Plugins > Local plugins > Data Hub plugins > Version 1 import > Field mapping > User Fields tab.
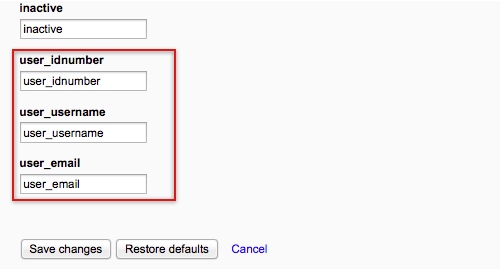
When these new fields are added to the file they become the default identifying fields and the standard identifying fields can then be used for updating. Here are two example files that demonstrate how to set this up.
The first one will use the 'user_idnumber' field as the identifying field and the 'email' field is being updated.

The second file will use the 'user_email' field as the identifying field and the 'email' field is being updated.

Note: The 'idnumber' field can not be updated once it has been set. If a file has the 'user_idnumber' field and the 'idnumber' field both values have to be the same.
Using Custom Profile Fields
Custom profile fields can be set via Data Hub user files. For Data Hub Basic the Moodle custom profile fields can be entered in user import files.On the Administration block > Site Administration > Plugins > Local plugins > Data Hub plugins > Version 1 import > Field mapping then go to the User fields tab. The Users fields tab list the custom profile fields below the standard fields. The property that should be entered in the user csv file is shown on the user property map, it can also be edited on this page. Data Hub Basic will always add "profile_field_" before the profile field shortname by default.
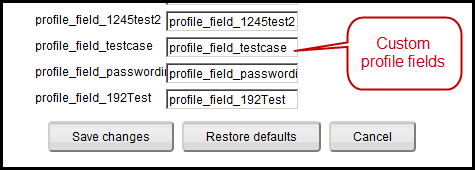
The property shown on the field mapping interface is entered in the header of the csv file and the value to be assigned for this field will go in the user row. The following example shows one Moodle custom profile field in the csv file. The property shown in the field mapping interface above has been added to the file header, profile_field_testcase. The values for the custom profile field are entered in the user row below the header.

The value entered will depend on the profile field:
- menu of choices: For this profile field assign one of the menu options to the user
- boolean: For the checkbox profile fields enter "0" to keep the checkbox unchecked, and enter "1" to select the checkbox
- text input: For text input, just add text
Importing Course Information
The Course tab is where you can set the import parameters for course information. Go to the Administration block > Site Administration > Plugins > Local plugins > Data Hub plugins > Version 1 import > Field mapping.The course properties mapping table enables you to map the names of course properties from your export file to properties in Data Hub. Any of these parameters can be set or updated via the Data Hub import file.
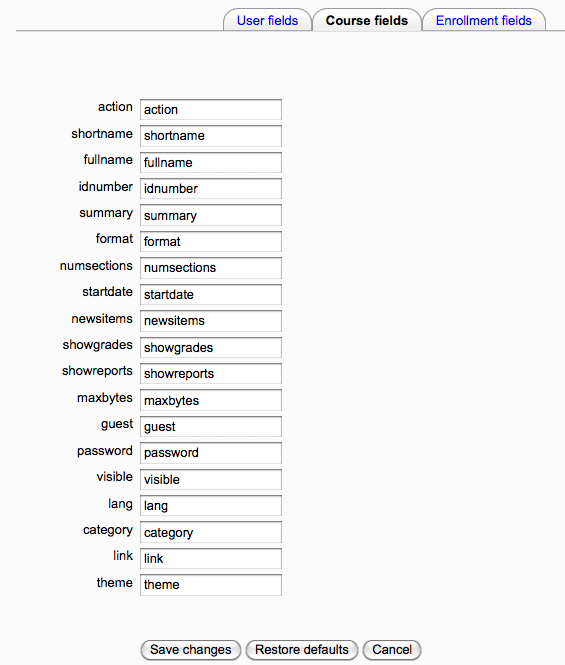
If you make changes to the property values, be sure to save your changes with one of the save buttons on the bottom of the screen.
The properties that can be set via the course csv file are listed below with brief descriptions:
| action: | The actions for courses are create, delete, or update. |
| shortname: | The course shortname. |
| fullname: | The fullname of the course. |
| idnumber: | The course id number. |
| summary: | Enter the summary. |
| format: | The course format, e.g., topics or weeks. |
| numsections: | The number of topics or weeks. If this optional field is used in the csv file, a value must be put in for each course. |
| startdate: | Enter the start date, e.g., 09/05/2010 (MM/DD/YYYY). |
| newsitems: | Enter how many news items will be shown, 0-10. |
| showgrades: | Enter yes or no. A number format will also work, enter 1 for yes or 0 for no. |
| showreports: | Enter yes or no. A number format will also work, enter 1 for yes or 0 for no. |
| maxbytes: | The maximum upload size for files in the course. Currently the site default will be used for this setting, not the value entered in the file for this field. |
| guest: | Enter yes or no for guest access to the course. A number format will also work, enter 1 for yes or 0 for no. |
| password: | Enter password if one is used. |
| visible: | Enter yes or no in the visible column to set the course visibility or availability. A number format will also work, enter 1 for yes or 0 for no. |
| lang: | Set the course language. Enter the language as it is shown in the Moodle course, e.g., English (en_us). Currently the site default will be used for this setting, not the value entered in the file for this field. |
| category: | The course category, e.g., miscellaneous. If the category name in the file hasn't been created yet the file will create the new category/sub-category. |
| link: | Enter the shortname of the template course in the link column of the csv file, if a template course is being used. The next page has more information about creating courses using templates. |
| theme: |
- category
- fullname
- shortname
- action
Data Hub Actions
DH tells Moodle what needs to be done with imported data via the Actions column. The following actions can be performed for courses:
- create - create a course
- delete - delete a course
- update - update a course.
In the Category column, /, designates a sub-category. For example, in row 2 Templates is a sub-category of OSHA Courses. If the category name in the file hasn't been created yet the file will create the new category/sub-category.

When deleting courses all 4 of the required fields must be included. Line 5 of the in the image is deleting a course.
Select this link to download the csv file shown in the image above.
Note that the courses in rows 4 and 5 were added to the site before the file was processed.Course CSV file FAQ:
- Does the .csv file have to contain all headers/columns?
No, just the required headers and the headers for data you want to change. - If we leave a field blank, does it override current data or ignore it?
Blank fields in non-required columns are ignored. - Can we use the course ID number for the course template feature or does it have to be the short name?
The template course's shortname is what is used for identifying the template course. - Can we include assigning the teacher to that role in the course to this file, or does it have to be a separate file?
All role assignments are done via the enrol.csv file, and not by the course.csv file. - Can we create courses that are not enroll-able?
Currently there isn't a method to set courses as not-enroll-able via DH - instead you can create courses and set them to invisible, then run an update and make them visible.
Importing/Processing DH Files
Course files can be processed manually or can be scheduled to automatically process. Manual processing should be used for testing small files only, for more information about scheduling files to process select this link. To manually process files go to the Administration block > Site Administration > Plugins > Local plugins > Data Hub plugins > Manage Plugins. Under the Version 1 import section select the "Go" link in the Run manually column.

Next to (2) Course file select the "Choose a file" button to select a file to upload or drag and drop a file onto the space. Then select the Run Now button.

Once the file is processed there will be a brief log message stating whether or not the file import was successful.
A complete log of all actions is kept in the logs file, as well as (optionally) emailed to an address or addresses each time the DH script runs. You can also view/download logs by going to the Administration block > Site Administration > Reports > Data Hub logs link.
For information about scheduling imports to automatically process go to this page Importing/Processing Files.
Using Template Courses
Data Hub Basic enables the creation of courses using Moodle courses as templates. A course template is an existing Moodle course - this course will be automatically backed up (without user data) and restored into each course that calls it as a template.A common use for this functionality is automatic course rollover - when a site administrator wants to create copies of a previous semester's courses for faculty to use in a new semester.
Another common use is to create new courses from a template course - for example if you would like a custom block layout or a set of blocks not standard in Moodle, then you can create a course with that block layout, and set DH use that course as a template for creating new courses.
You can use as many templates as you like, so for example if one Department wants to create new courses with one set of blocks and/or block layout, and another department wants to create new courses with a different set of blocks and/or block layout, then you can accomplish this by setting one template course for each department's new courses.
The following image demonstrates how to setup a CSV file for this. The fields necessary to make this work are:
- action - Enter "create".
- fullname - Enter the name of the new course.
- shortname - Enter the shortname of the new course. The new course's shortname must be different than the template course.
- link - Enter the shortname of the template course.

Any of the fields from the course properties map can be entered in the CSV file.
Select this link to download this CSV file.
Note - this sample file will only work if you have the existing template course on your Moodle site. The shortname of the template course is entered in the Link column of the file. So a course with shortname "electricalsafety" must exist on the site for this file to process successfully.
Importing Enrollment Information
Enrollment in Moodle is dependent on the context. If a user is enrolled as a student in a course, then they are given the role called 'student' - with permissions that are set for that role in Moodle's roles administration area, in the context of a course. A teacher could also be enrolled in a course - in this case they are given the role of teacher (with the permissions that are set for that role), in the context of a given course.Data Hub Basic enables you to set the roles of users via the import file, once you have created courses you can enroll users in these contexts. The most common types of enrollment are for students/learners and teachers/instructors.
The Enrollment fields tab is where you can set the import parameters for enrollment fields. Go to the Settings block > Site Administration > Plugins > Blocks > Data Hub Plugins > Version 1 import > Field mapping. Then select the Enrollment fields tab.
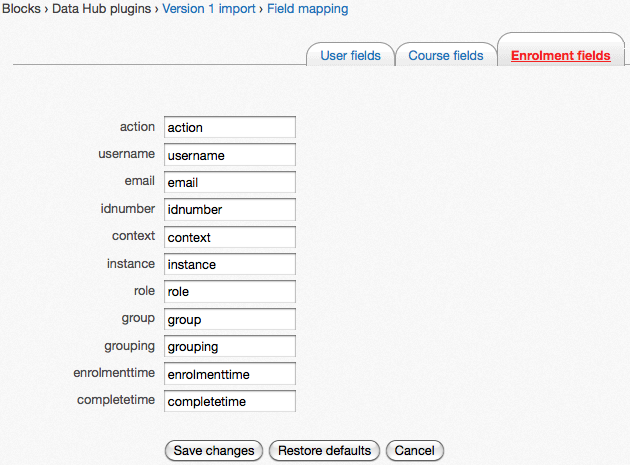
If you make changes to any property values, be sure to save your changes with the Save changes button on the bottom of the screen. Use the Restore defaults button to restore the profile fields to their original state.
The properties that can be set via the enrollment file are listed below with brief descriptions:
| username: | The username for the user that will be assigned the role. |
| email: | The email for the user. |
| idnumber: | The idnumber for the user. |
| context: | Set the context for the role at system, user, course, or block context. For example, user A is added as a teacher in course A or parent A is added to the parent role of student A. |
| instance: | The name/shortname/username of the item you want to set the role at, e.g., the shortname of the course being updated. |
| role: | The short name for the role the enrollment gives the specified user in the specified context/course. To find the role short name go to the Site Administration block > Users > Permissions > Define roles and the short names of the roles are in the 3rd column of the chart, Short name. |
| group: | The name of the group the user should be added to. If the group doesn't already exist it will be created. |
| grouping: | The name of the grouping the user should be added to. If the grouping doesn't already exist it will be created. |
| enrolmenttime: | Enter the date when user enrollment should occur, the current date will be used if this field has no entry. The date format is DD/MM/YYYY. |
| completetime: | The date the user completes the course. The date format is DD/MM/YYYY. |
| action: | The actions for enrollment files are create or delete. The action "add" was used instead of "create" in Data Hub 1, it will still work in Data Hub 2.0. |
The required fields for enrollments are:
- role - role shortname
- username - of the user being assigned the role
- context - the role can be assigned at the system, user, course, or block level
- instance- name, username, shortname of the context the role is assigned in
- action - enter create or delete. The action "add" was used instead of "create" in Data Hub 1, it will still work with Data Hub 2.
Data Hub Actions
DH tells Moodle what needs to be done with imported data via the Actions column. The following actions can be performed for enrollments:
- create - add users to a role in a specific context, e.g., a course.
- delete - remove users from a role.

In the file the following actions are taking place. Row 2 is assigning Dave the student role in the course with shortname testcourse. Row 3 is deleting Debra from the student role in the course with shortname testcourse. Row 4 is assigning Chris to a counselor role in the user context for Dave. Row 5 is assigning Maria to a system role. Row 6 is assigning Hector to a course category role.
Select this link to download a csv copy of the file in the image. Note that the users, courses, and roles in the file have to be added to the site before this file could be processed correctly.
The Parent Role Use Case page of this book contains more information about setting up a parent role and assigning the parent role to a student user via an Data Hub upload.
Importing/Processing Data Hub Files
Enrollment files can be processed manually or can be scheduled to automatically process. Manual processing should be used for testing small files only, for more information about scheduling files to process select this link. To manually process files go to the Administration block > Site Administration > Plugins > Local plugins > Data Hub plugins > Manage Plugins. Under the Import Plugins section select the "Go" link in the Run manually column.

Next to (3) Enrollment file select the "Choose a file" button to select a file to upload or drag and drop a file onto the space. Then select the Run Now button.

Once the file is processed there will be a brief log message stating whether or not the file import was successful.
A complete log of all actions is kept in the logs file, as well as (optionally) emailed to an address or addresses each time the Data Hub script runs. You can also view/download logs by going to the Administration block > Site Administration > Reports > Data Hub logs link.
For information about scheduling imports to automatically process go to this page Importing/Processing Files.
Assigning Users to Groups
Automatically Creating Groups and Groupings:
When users are being enrolled in Moodle courses with Data Hub they can be also be added to groups and groupings in the course. The groups can be existing already or Data Hub can be used to create the groups.To create groups with Data Hub a setting located on the Data Hub block configuration screen needs to be enabled. It's shown on the bottom of the next image.
Note: this setting is needed to create groups and groupings from your import file, for adding users to existing groups and groupings this setting does not need to be enabled.

Adding users to Moodle groups and groupings:
The file setup is the same for creating a new group and adding users to it, and for adding users to an existing group. The following image is showing a sample file for adding a user to a course and a group of the course. If the group name does not exist in the course already, then Data Hub will create it if the setting shown above is enabled.
Assigning Parent Roles
This use case will demonstrate how to:- Create a parent role
- Create/upload a CSV file via Data Hub to add users to the parent role of students
- Use the new parent role
Creating the Parent Role
To create the parent role go to the Site Administration > Users > Permissions > Define roles. Go to the the bottom of the page and select the 'Add a new role' button. There are 5 permissions that will be allowed for this Parent role:
- Users
- Edit user profile - moodle/user:editprofile
- See all user blogs - moodle/user:readuserblogs
- See all user posts - moodle/user:readuserposts
- See user activity reports - moodle/user:viewuseractivityreports
- Course
- View user profile - moodel/user:viewdetails
Creating/Uploading the CSV file
There are 5 required fields to create the CSV file to assign parent roles to users via Data Hub:
- action: add this user to the following role in the following
- context: this user will be assigned a role in the user context
- instance: in this example the instance is the student user, enter the username
- username: enter the username of the user receiving the new role permissions
- role: enter the shortname of the role being assigned

The users in this example have already been added to the site. If users have not been added to the site, add the users via a user file or other methods first.
Any of the properties included on the Version 1 import > Field mapping > Enrollment fields tab can be included in the CSV file.
Once the file has been created it can be uploaded and processed. To upload and process the file go to the Administration block > Site Administration > Plugins > Local plugins > Data Hub plugins > Manage plugins. The image in the following screen will open. Under the Import Plugins section select the "Go" link in the Run manually column.

Choose an (3) enrollment file to upload. Then select the Run Now button at the bottom of the page.

A brief log message will be displayed about the success of the file that was processed.
The new role can be located by going to the student user's profile screen. Then go to the Administration block > Profile settings for Connors Melanie > Roles > Assign roles relative to this user.
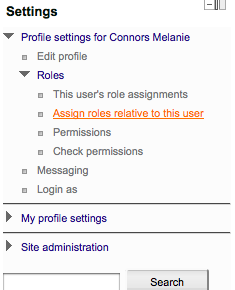
That will open a page where we can see the role assignment we created will the Integration point file.

Using the Role
To demonstrate how the role is used I'll login as the user that was just assigned to the parent role. The user will see the the student user they were assigned the parent role for in the Mentees block.
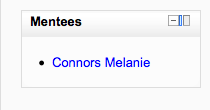
If the parent user selects the student user's name from the Mentees block, they will be linked to the student user's profile screen. From here the parent user can access the features they have permissions to use.
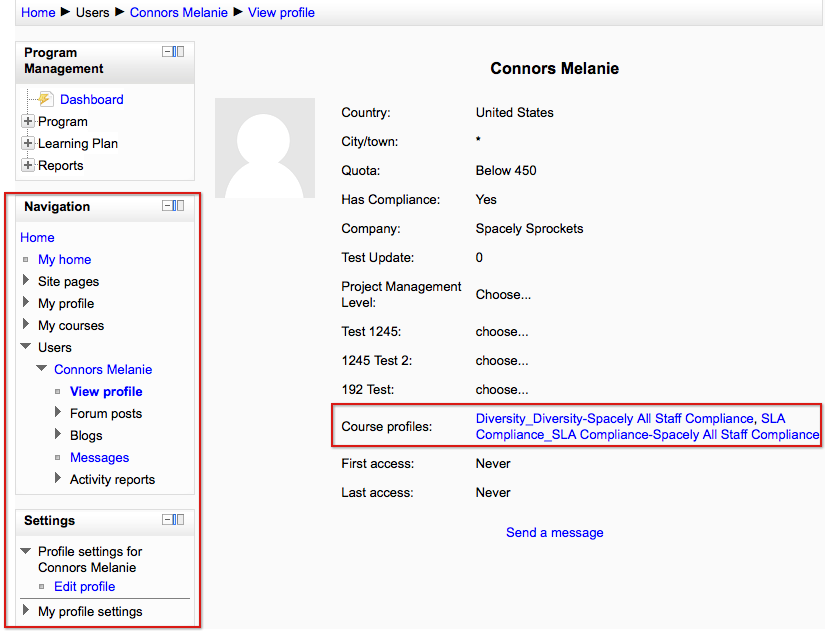
The courses the student user is assigned to can be linked to here from the Course profiles section of the user profile, each course name is a link to the course. The parent user does not have full access to the courses though, just the features they have permissions to use.
Exporting Grade Information from Moodle via DH
Data Hub can export final grade information (number and/or letter grades) in csv format. This can be imported to an SIS/ERP record keeping program (Banner, Peoplesoft, SAP, etc.). What is provided by Data Hub is a regularly exported csv file with either incremental data (grades changed/updated since the previous export) or a full export of all grade data on the system. Custom user profile fields can be added to this export.Access export settings by going to the Administration block > Site Administration > Plugins > Local plugins > Data Hub plugins > Version 1 export. The screen in the following image will be shown.
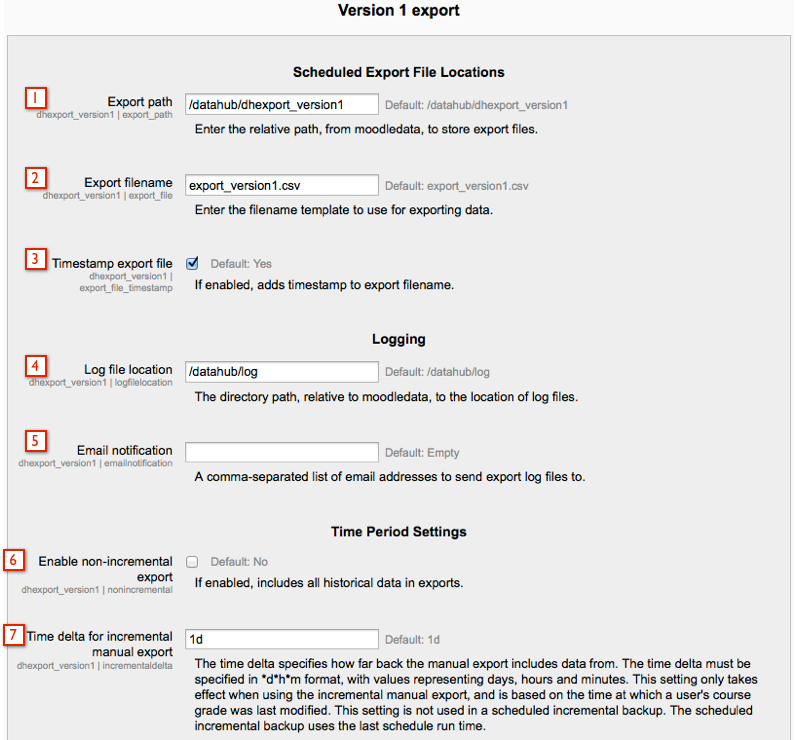
- Export path - Enter the path to store export files.
- Export filename - Enter the filename for export files.
- Timestamp export file - Adds timestamp to export file name.
- Log file location - Location of the log file. New locations can be created by adding a new path, when the export runs the new path will be created.
- Email notification - Enter the email of users that should receive the export log file by email.
- Enable non-incremental export - This is used for scheduled exports. Enable this feature to include all data for users. Disable this feature to include all data for users since the last scheduled export.
- Time delta for incremental manual export - This setting is used for manual exports.
- first name
- last name
- username
- user idnumber
- course idnumber
- start date
- end date
- grade
- letter grade
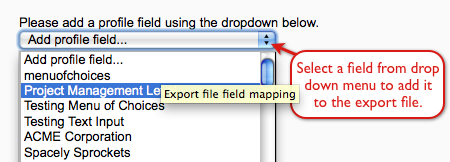
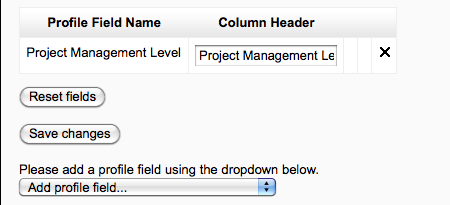
The Project Management Level profile field has now been added to the export file. The column header for the custom profile field in the export file can be edited once the profile field has been added.
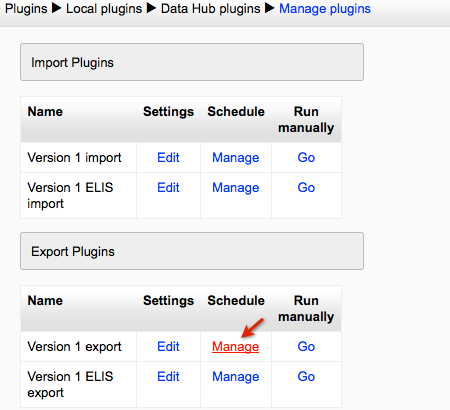
Export files can be run manually or can be scheduled to run automatically. To schedule an export to automatically run go to the Administration block > Site Administration > Plugins > Local plugins > Data Hub plugins > Manage plugins. Under the Export Plugins section select the "Manage" link under the Schedule column.
Then select the "New Job" button.

Enter the Label and Period for the job. The example in the next image has the period set for one day. So this export will run one day from the time this job is created and then it will run once every day at about the same time. If you only want the scheduled job to run once it needs to be deleted after it has run.
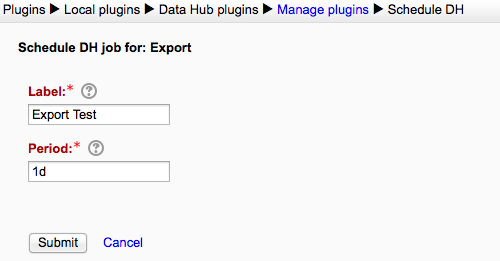
There are new scheduling features for Data Hub 2.7.7.0+ and 2.8.5.0+. Data Hub now has an advanced scheduling option.
There are two steps to schedule a Data Hub job with the new improvements. The first step is to enter a Label for the job.

Step 2 sets when the job runs. There are two options, advanced scheduling and basic period scheduling. Basic period scheduling is the type of scheduling used in ELIS versions prior to 2.7.7.0 and 2.8.5.0. Advanced scheduling is the new feature shown below.
There are two types of recurrence settings for advanced scheduling, simple and calendar. Select which one you will be using as shown in the next image. Each recurrence has different settings, so the settings will change depending on which recurrence you select.

- Select this to run the report once a day indefinitely.
- Select this to run the report once a day until the date selected.
- Select this to run the report a certain number of times at one of four intervals - minutes, hours, days, or months. In the example shown in the image above this setting will run the report once a day for 7 days.

- End date: Select the date when the report should stop running. Select the Enable checkbox to enter an end date.
- Time: Use the drop downs to enter the time. The hours drop down uses a 24 hour format. For example, 16:55 is 04:55 PM.
- Days: select whether the report runs every day, only on specific week days, or specific month days.
- If week days is selected, select which days.
- If Month days is selected, enter a number for the day of the month the report should run. For example, 15 for the 15th.. If the report should run on more than one month day, enter day numbers separated by commas.
- Months: Select the months in which the report runs. For example, if the report is scheduled to run on January and July only, and the Month days is set to 15, then it runs on January 15 and July 15. If the report was set to run every Friday (in the Week Days) then it would run every Friday in July and January.
Files from scheduled exports are saved in the Export path, which is displayed in the Administration block > Site Administration > Plugins > Local plugins > Data Hub plugins > Version 1 export link. The following image is showing scheduled jobs.
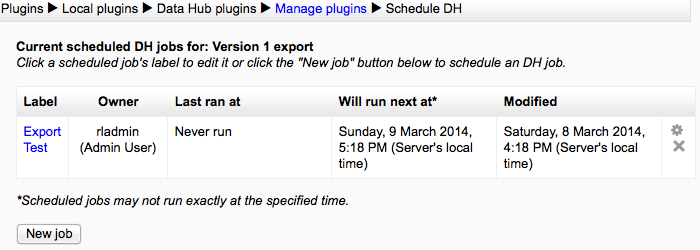
To run a export file manually go to the Administration block > Site Administration > Plugins > Local plugins > Data Hub plugins > Manage Plugins. Under the Export Plugins section select the "Go" link in the Run manually column.
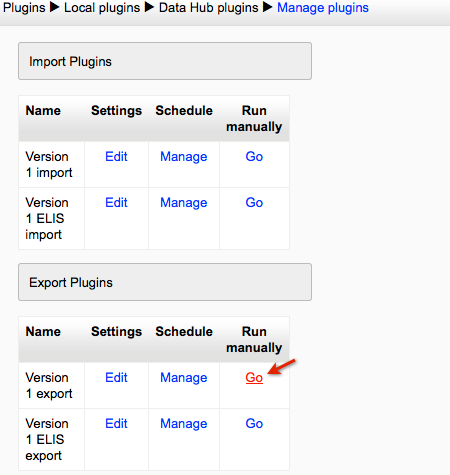
Then select the Run Now button. The file will be presented for download. If the file takes to long to run then the file will be saved in the Export path (displayed on the Version 1 export settings screen).
The following image shows an example of an export file.

This file is displaying completion information for users that have completed a course within the last day. If a user is in multiple courses, each course will have a separate row in the file.
The end date for users in the export will be the date the export is run.
Importing very large user and enrollment files:
Importing very large user and enrollment files:Moodle relies on a timed procedure, know as the Moodle cron, to run many recurring tasks, such as sending notifications, forum posts, and messages, running reports such as ELIS reports and completion checking, and integration related batch processes such as LDAP synchronization. By default, Data Hub also uses the Moodle cron to process enrollment files. When these files exceed 40,000 lines of data, it may take too long to run, causing other operations to fail to run.
To address this issue for very large enrollment/user creation files, we implemented a separate system-level cron process to call the Data Hub processes by itself which will not impact the Moodle cron from running regularly.
To disable the Data Hub plugin from running in the Moodle cron go to the Administration block > Site Administration > Plugins > Local plugins > Data Hub Settings. This will turn off the standard cron process for DH - this will stop DH from processing files, so please makes sure Remote Learner support confirms that the DH Cron is operational before this is activated.
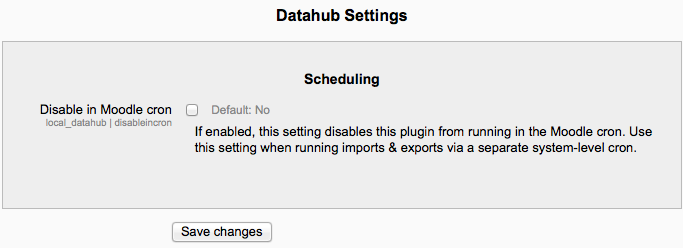
If you need to run very large enrollment files, please open a support ticket to have the optional large file processing cron task setup for you - checking the box in the example above will not setup the DH cron for you, it will just disable the standard cron, meaning DH will no longer run.
Remote Learner support will have to configure your server to run the actual cron to process the Data Hub files. Running the specialized DH cron also requires that your hosting level be at our Hosting Level 3, or above, or on our Red Hat Enterprise Virtual server system.
Disable in Moodle Cron Override
This feature enables you to hide the Disable in Moodle cron setting and force the setting on by going into your site's config.php file and adding the following line: $CFG->forcedatahubcron = true;
Navigate to the Administration block > Site Administration > Plugins > Local plugins > Data Hub. A new message replaces the setting shown in the image above, "Disable in Moodle cron" has been forced on in config.php: $CFG>forcedatahubcron.
To restore the hidden setting remove the line added to the config.php file and refresh the page.Automating Data Hub
Once you have developed a process to export data from your SIS/MIS/ERP/HR system into Integration Point's CSV format, you can further automate the process of data import using the standard SCP and scripted SFTP formats.Please complete Data Hub's setup and make sure the system is configured correctly and data imports are working correctly before adding the step of automating the process.
Due to the wide variety of different possible operating system configurations and SFTP/SCP applications, Remote Learner's standard support for Data Hub does not include configuring your system to send files to Remote Learner's servers1.
However, the SFTP protocol has been a standard for many years, and there are many sources for information on how to script it to automatically send files to a remote system.
Here are several tutorials that describe methods to script files to be sent automatically from Unix/Linux and Windows servers:
Windows using the free WinSCP tool:
http://winscp.net/eng/docs/scripting
Linux/Unix:
http://www.snailbook.com/faq/scripting-sftp.auto.html
Please note that these links are offered as examples, they are not meant to be comprehensive nor exclusive, and Remote Learner's standard support for Data Hub does not include setting up or debugging SCP/SFTP scripts1.
1. Advanced support for building and testing an SCP/SFTP automation process may be available from our Professional Services Group, please discuss this with your Remote Learner account representative.
Full list of actions and required fields for each
| Entity |
Action |
Required Fields |
Success Message |
Failure Message |
|---|---|---|---|---|
| user |
add |
username, password, firstname, lastname, email, city, country |
User with username "[username]" successfully created. |
User with username "[username]" could not be created. or User could not be created. |
| user |
update |
username / email / idnumber These are identifying fields, only one is required to update a user. Identifying fields can not be updated. |
User with username "[username]" successfully updated. |
User with username "[username]" could not be updated. or User could not be updated |
| user |
disable |
username / email / idnumber These are identifying fields, only one is required to delete a user. |
User with username "[username]" successfully deleted. | User with username "[username]" could not be deleted. or User could not be deleted. |
| roleassignment (role assignment) |
create |
username / email / idnumber, context (context level name), instance (context instance identifier), role (role shortname) |
User with username "[username]" successfully assigned role with shortname "[shortname]" on [context] "[instance]". For version 1 plugin, if performing group / enrolment action (only show relevant sentences): User with username "[username]" successfully assigned role with shortname "[shortname]" on [context] "[instance]". User with username "[username]" enrolled in course with shortname "[instance]". Created group with name "[group]". Assigned user with username "[username]" to group with name "[group]". Created grouping with name "[grouping]". Assigned group with name "[group]" to grouping with name "[grouping]". |
User with username "[username]" could not be assigned role with shortname "[shortname]" on [context] "[instance]". or Role assignment could not be created. See notes below about implementation in version 1 plugin. |
| roleassignment (role assignment) | delete |
username / email / idnumber, context (context level name), instance (context instance identifier), role (role shortname) | User with username "[username]" successfully unassigned role with shortname "[shortname]" on [context] "[instance]". Add applicable statements: User with username "[username]" unenrolled from course with shortname "[instance]". |
User with username "[username]" could not be unassigned role with shortname "[shortname]" on [context] "[instance]". or Role assignment could not be deleted. See notes below about implementation in version 1 plugin. |
| enrolment |
create |
username / email / idnumber, courseshortname (course shortname) |
User with username "[username]" successfully enrolled in course with shortname "[shortname]". |
User with username "[username]" could not be enrolled in course with shortname "[shortname]". or Enrolment could not be created. Enrolment into {$context_descriptor} has failed for user with {$user_descriptor}, likely due to manual enrolments being disabled. See notes below about implementation in version 1 plugin. |
| enrolment |
delete |
username / email / idnumber, courseshortname (course shortname) | User with username "[username]" successfully unenrolled from course with shortname "[shortname]". | User with username "[username]" could not be unenrolled from course with shortname "[shortname]". or Enrolment could not be deleted. See notes below about implementation in version 1 plugin. |
| course |
create |
fullname, shortname, category (category name / path / id) |
Course with shortname "[shortname]" successfully created. For version 1 with reference to non-existent category: Course with shortname "[shortname]" successfully created. Category with name "[name]" successfully created. |
Course with shortname "[shortname]" could not be created. or Course could not be created. |
| course |
update |
shortname |
Course with shortname "[shortname]" successfully updated. | Course with shortname "[shortname]" could not be updated. or Course could not be updated. |
| course |
delete |
shortname |
Course with shortname "[shortname]" successfully deleted. | Course with shortname "[shortname]" could not be deleted. or Course could not be deleted. |
| course |
createfromtemplate |
fullname, shortname, templateshortname (template course shortname) |
Course with shortname "[shortname]" successfully created from template course with shortname "[templateshortname]". | Course with shortname "[shortname]" could not be created from template course with shortname "[templateshortname]". |
| group |
create |
courseshortname (course shortname), name (group name) |
Group with name "[name]" successfully created in course with shortname "[courseshortname]". |
Group with name "[name]" could not be created in course with shortname "[courseshortname]". |
| group |
update |
courseshortname (course shortname), name (group name) | Group with name "[name]" successfully updated in course with shortname "[courseshortname]". | Group with name "[name]" could not be updated in course with shortname "[courseshortname]". |
| group |
delete |
courseshortname (course shortname), name (group name) | Group with name "[name]" successfully deleted from course with shortname "[courseshortname]". | Group with name "[name]" could not be deleted from course with shortname "[courseshortname]". |
| groupassignment (group assignment) | create |
courseshortname (course shortname), name (group name), username / email / idnumber |
User with username "[username]" successfully assigned to group with name "[name]" in course with shortname "[shortname]". |
User with username "[username]" could not be assigned to group with name "[name]" in course with shortname "[shortname]". |
| groupassignment (group assignment) | delete |
courseshortname (course shortname), name (group name), username / email / idnumber | User with username "[username]" successfully unassigned from group with name "[name]" in course with shortname "[shortname]". | User with username "[username]" could not be unassigned from group with name "[name]" in course with shortname "[shortname]". |
| enrolmentplugin (enrolment plugin) |
update |
courseshortname (course shortname), shortname (plugin shortname) |
Enrolment plugin with shortname "[shortname]" successfully updated in course with shortname "[courseshortname]". |
Enrolment plugin with shortname "[shortname]" could not be updated in course with shortname "[courseshortname]". |