iMail
Documentation for iMail.
- Site:
- Learning Spaces
- Course:
- iMail Documentation
- Book:
- iMail
- Printed by:
- Guest user
- Date:
- Wednesday, December 24, 2025, 5:03 PM
iMail Introduction
iMail provides flexible way for students and teachers to communicate in a one-to-one, one-to-many, and/or many-to-many fashion. However, for many reasons schools or institutions may not want to use standard email for their courses. The iMail tool provides a 'closed garden' email like system, where all messages are kept within the Moodle LMS, by giving students and teachers an inbox for each course.iMail provides each student with an inbox for each course, the ability to create email like messages with drafts, attachments (single or multiple), contact lists, and all the usual features of a WebMail program. The main difference between iMail and a webmail/email integration (such as the Moodle-GMail integration) is that _all messaging stays within the Moodle system. There are also available options for content reports and for parental view/copying of email messages between students.
| REMOTE-LEARNER iMail INFORMATION SHEET iMail provides an inbox/contact list for each course, with standard email client functionality, providing a flexible user to user communication system within Moodle. Why iMailEmail provides flexible way for students and teachers to communicate in a one-to-one, one-to-many, and/or many-to-many fashion. However, for many reasons schools or institutions may not want to use standard email for their courses. The imail tool provides a 'closed garden' email like system, where all messages are kept within the Moodle LMS, by giving students and teachers an inbox for each course. What is iMail? iMail provides each student with an inbox for each course, the ability to create email like messages with drafts, attachments (single or multiple), contact lists, and all the usual features of a WebMail program. The main difference between imail and a webmail/email integration (such as the Moodle-GMail integration[1|#ftn1]) is that _all messaging stays withinthe Moodle system. There are also available options for content reports and for parental view/copying of email messages between students. Typical iMail Customer:iMail is designed primarily for two customer types:
Business drivers:
iMail Features:General Features:
Composition Features:
Choosing who to send the message to
Course Based Features:
Viewing Messages:
Printing messages:
Optional features:Content (aka 'Bad words') report:
Folder quotas:Site administrators can use this feature to limit the size of user's inboxes |
Administration Settings
Once the block has been installed go to the Administration block > Site Administration > Modules > Blocks > iMail. This will open the block configuration screen: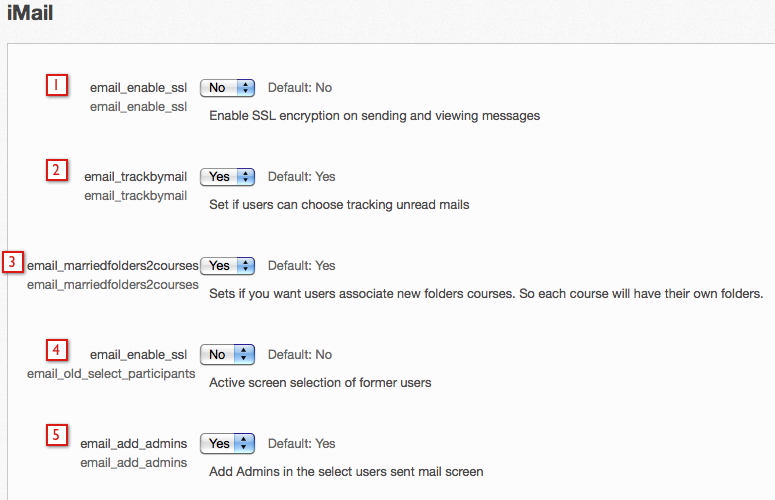
The settings here are fairly self-explanatory.
- SSL - if this is enabled and SSL is setup on the site, email will be encrypted.
- If this is enabled users can choose to receive alerts in their external email account of new messages in their iMail inbox. If this is turned off - set to "No"- then no users on the site will receive email alerts from iMail in their external email (note that this does not deactivate forum post notifications, etc.).
- This setting will create an inbox for each course
- This uses an older user selection method for selecting contacts to send the email to.
- This will enable users to send email to site administrators
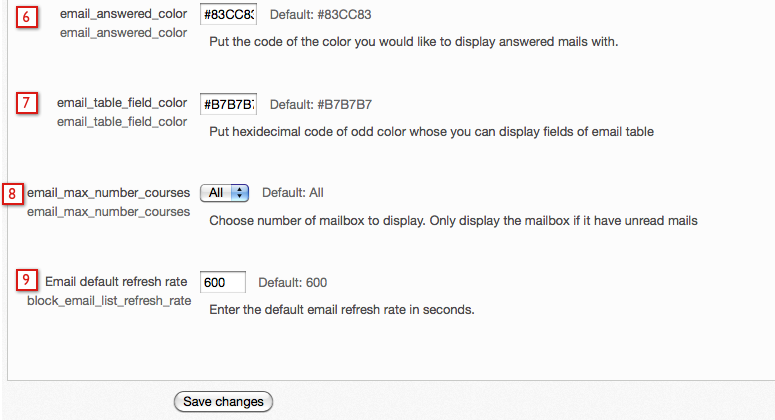
- This is the color that emails a user has answered will show up as.
- This is the color that will be alternated when viewing email to help keep them separate.
- This can be used to limit how many course mailboxes will be shown - though the system will only show mailboxes in the iMail block if there are new messages (the user can see all their inboxs when they go into the iMail block).
- Available in ELIS 1.8.8+ versions
Role Permissions/Capabilities
In most cases the default capabilities are sufficient, however there are six iMail permissions that can be modified in a given role and context if necessary: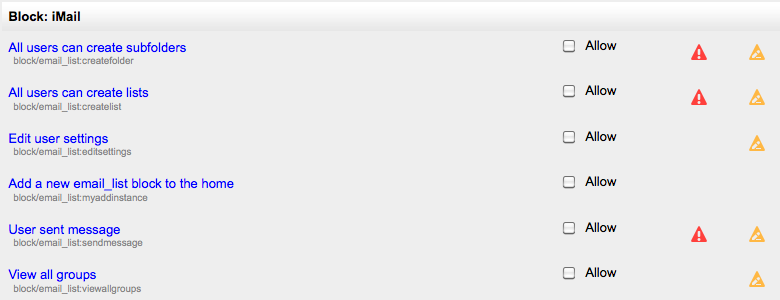
The iMail Interface
The iMail block - teacher and student users can see the iMail block in Moodle courses that have the block added to the course homepage. The following image is showing a teachers view of the iMail block on their course homepage.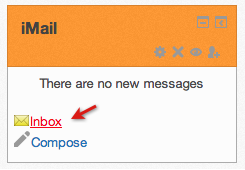
When a user clicks into a course inbox they see the full iMail interface:
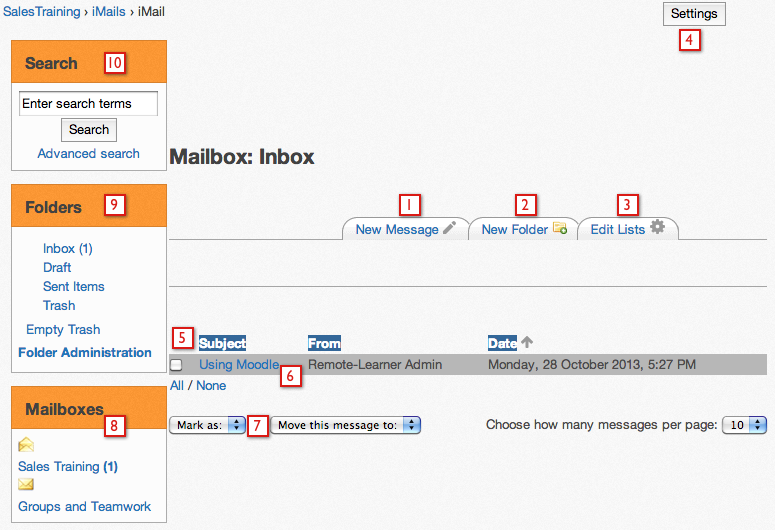
In the course inbox the user can...
- Click the New Message tab to compose a new message
- Click the New Folder tab to create a new folder.
- Click the Edit Lists tab to create new lists
- The user can click the "Settings" button to change their inbox settings (see below).
- View their messages, and sort by date, subject, and sender by clicking the Subject, From, and Date links.
- Unread messages are highlighted in the color set in the Admin settings, while read messages will be white (or the Moodle theme background color if it's now white).
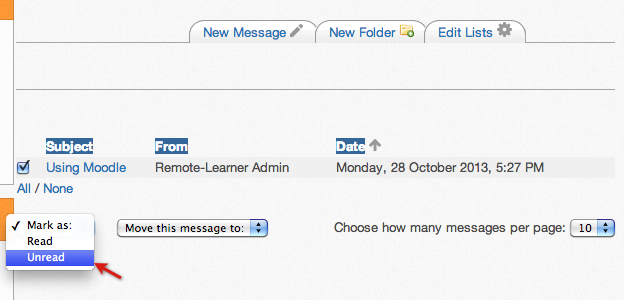
- They can select a message and move it to another folder and they can select a message or messages and mark as read or unread.
- The "Mailboxes" block shows all the courses the user is enrolled in and whether there is new mail in those courses.
- The folders list shows the user's folders and they can click the folder name to enter the folder (for example click the "Trash" link to view the trash. If the user creates a new folder in step 2, it will show up in this list.
- The user can enter text to search - iMail will search the full text of the messages and the user's names
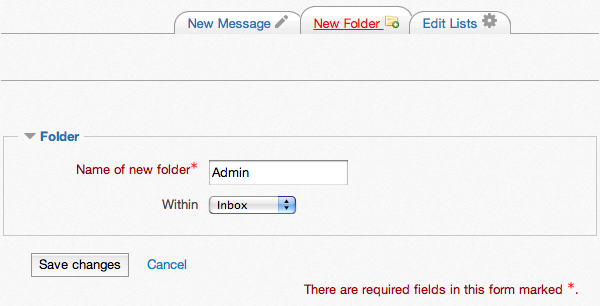
In the image below a teacher is adding a folder within the inbox to store emails related to administration.
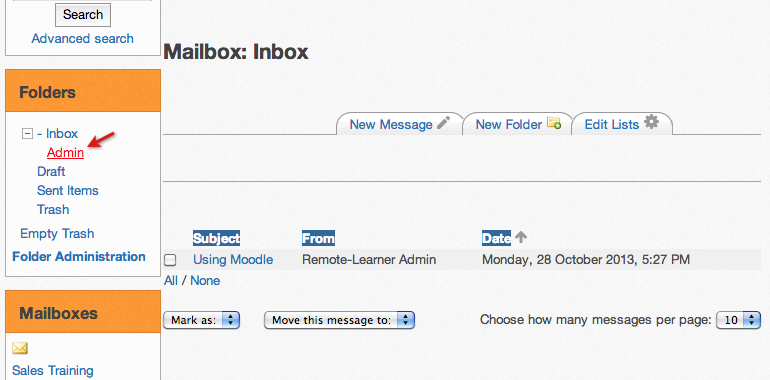
This folder can be accessed from the Folders block in the iMail interface. Select the + symbol next to the inbox to see/select the Admin folder.
Interface menus:
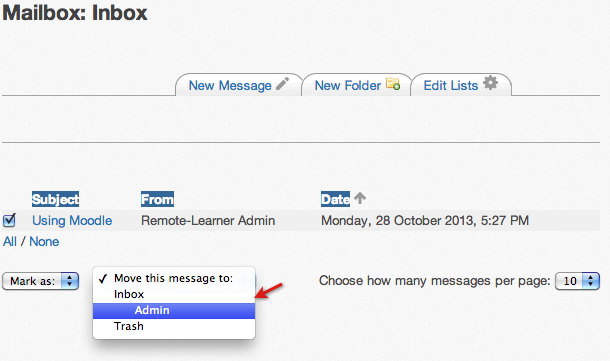
The "Move this message to:" drop down enables a user to move selected messages to a different folder. In the image below the teacher is moving a message to the new folder that was just created.
The "Mark as:" drop down enables a user to change the status of selected messages from Read to Unread, or vice versa.
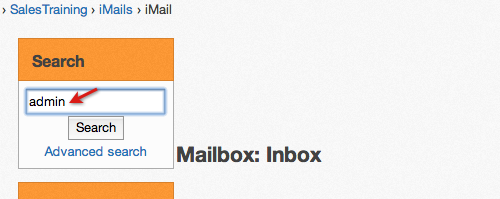
The search interface has 2 modes: simple and advanced. In the simple mode it just searches all text, user's names, message titles, etc. for the keyword(s) entered. In the next image "admin" is entered in the search field.
Advanced search enables the user to search in a more filtered manner:
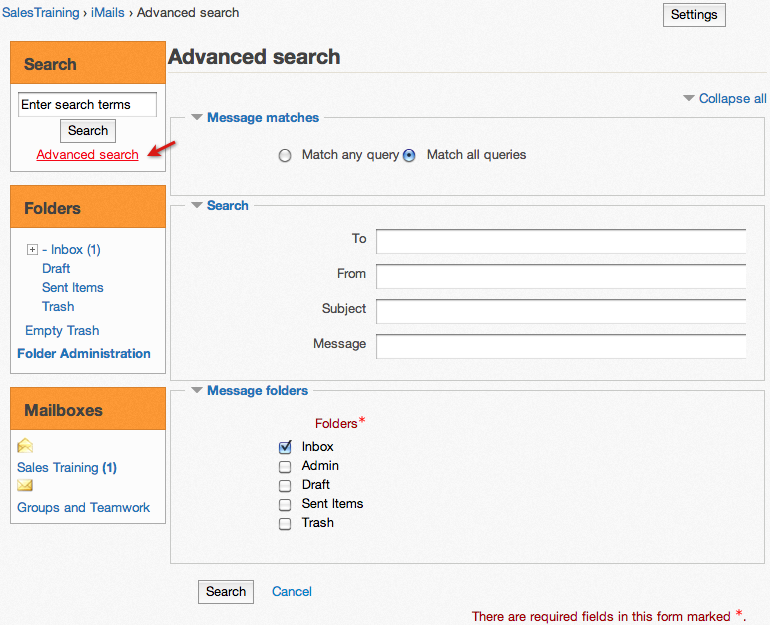
For instance by folder, or by where the keywords searched for are (sender's name, subject, etc.).
Printing messages: iMail enables users to select one, some, or all of their messages and print them. Selecting messages and clicking the Print button will open up a new window with the collated messages and the user's printer interface.
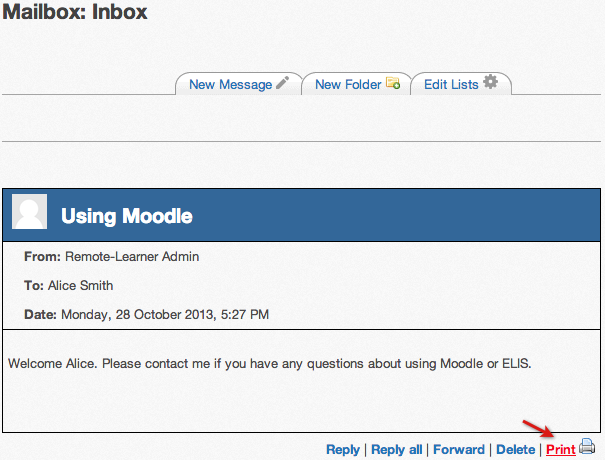
Note that attachments are not printed directly, to print attachments you would need to open the attachments and print them from within the application that handles them.
Deleting messages:
Deleted messages are sent to the iMail trash:
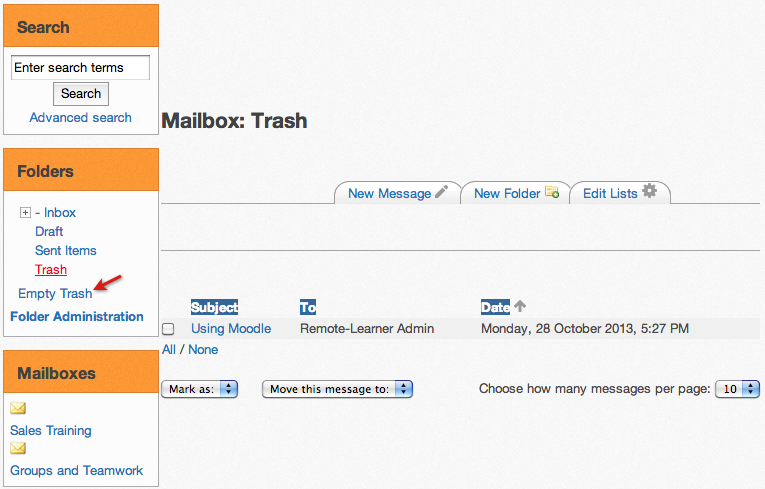
A user can go into the trash and move a message out by selecting the message and using the "Move this message to:" drop down. Or they can empty the trash by clicking the "Empty Trash" link.
The User Settings
The user settings can be edited from the iMail Inbox screen. Select the "Settings" button in the upper right hand corner.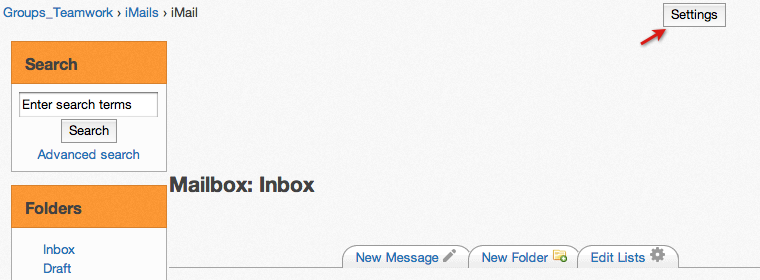
The user settings enables the user to customize a few things about iMail:
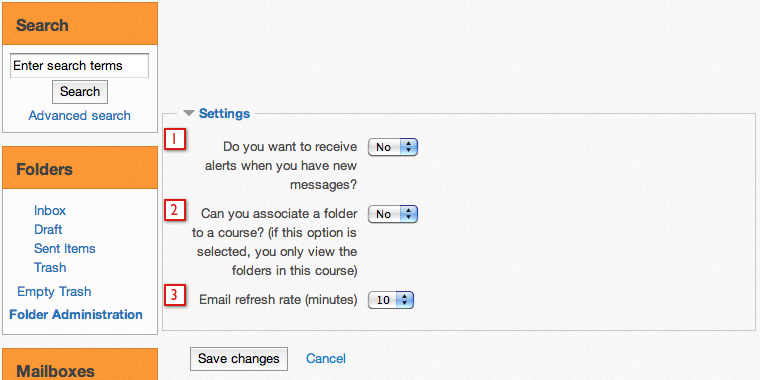
- Select Yes to have alerts about new messages sent to your regular email account.
- Select Yes to hide the folders from other courses and not show them in your inbox.
- Set the email refresh rate in minutes using a value from the menu of choices.
Sending Messages
When you click "New Message" you are taken to the email authoring screen: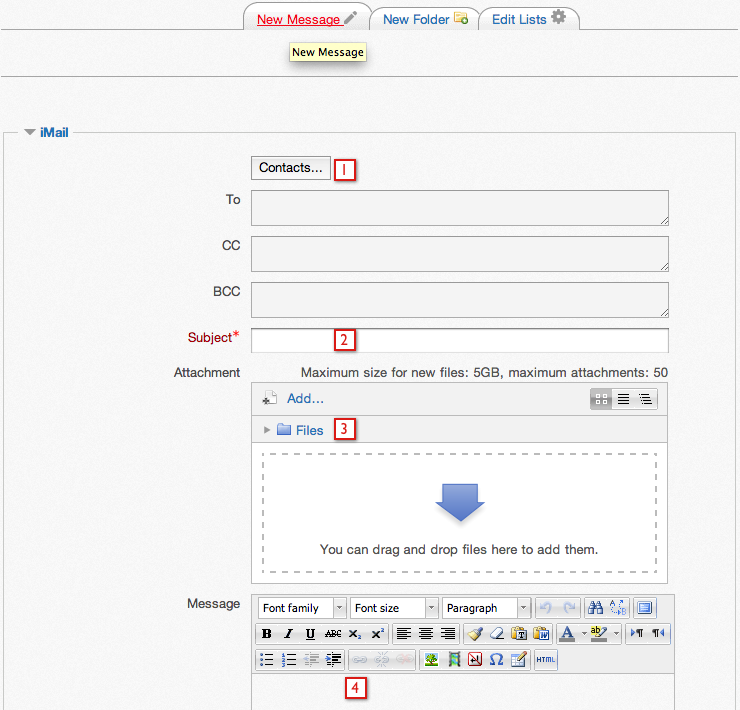
On this screen you can:
- Click the "Contacts" tab to see a list of users in the course you are in, which you can select to send your email to. You can also choose to send emails to user lists from the contacts screen. You can create user lists by going to the "Edit User" tab.
- Click the "Choose a file" button to select a file to attach to the message. You can attach one, several, or many files to a message. Note that currently iMail does not attach files in the Alfresco Repository, so you can only upload files as attachments (you can however link to repository files via the link and/image tools in the HTML editor).
- To attach files drag and drop files onto the Attachment space or select the "Add..." link.
- You can use the Moodle HTML editor to compose your email on supported browsers.
Selecting contacts:
When you open the contacts button, you will see the users you can send mail to in your current course. Click the "To", "CC", or "BCC" buttons to add users to your email. You can send to all users on a screen by clicking the "To all" link, shown in the header of the user list in the next image.
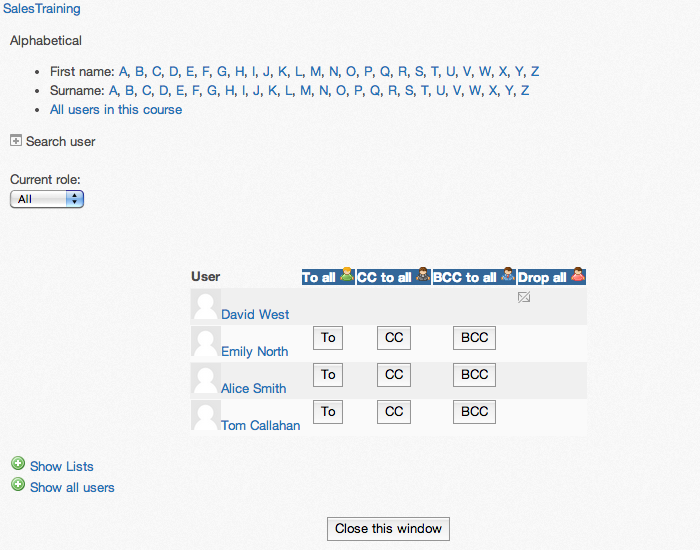
The users are added to the message - so you can go through all the pages in the page menu (at bottom) and add all users if you want, although most often sending a message to all users is done via the Moodle forums.
Lists the user has created will also be shown with the contacts. The user can send iMail to users in the list by selecting the list from the contacts screen:
- Select the "Show Lists" link. Once it is selected there will be a "Hide Lists" link, as shown in the next image.
- The lists this user created are shown at the bottom of the users list on page 1.
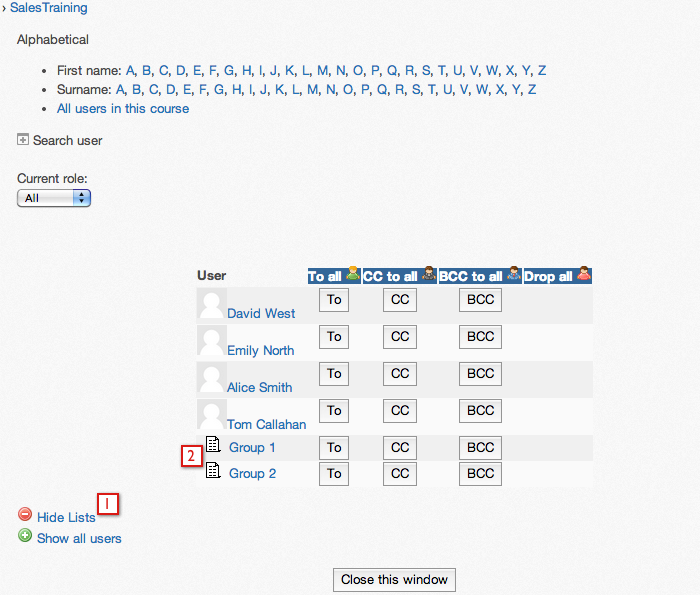
Searching for a user:
You can also search for specific users in via the search tool - this searches the user's names and can be handy in large classes.
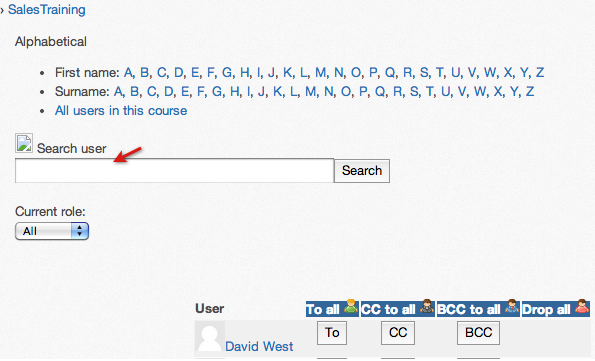
When you are done adding users to the message, click the "Close this window" button to return to the main email composition screen.
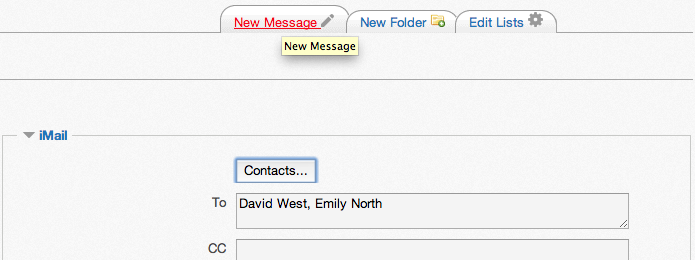
Now you can click the "Send" button to send your email, or the "Save Now" button to save it as a draft, or the "Cancel" button which will delete your message.
Just like regular email, you can't 'unsend' an iMail email, so make sure it's ready before hitting send
 .
.Creating Lists
iMail lists can be created or edited on the "Edit Lists" tab. For this example I have logged in as a student user of a course and accessed the iMail Inbox via the block in the course.To create or edit a list:
- Select the "Edit Lists" tab.
- Select "New List" from the menu of choices. Existing list can be edited by selecting them from the menu of choices as well.
- Enter the name of the new list and select Create.
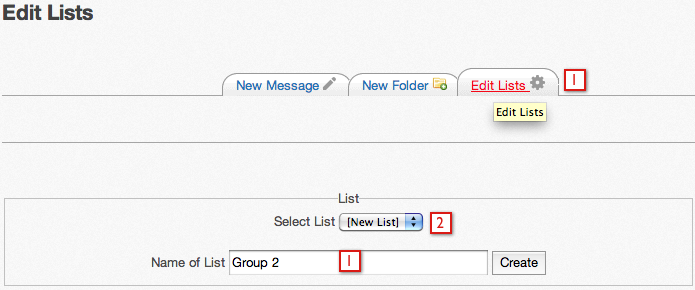
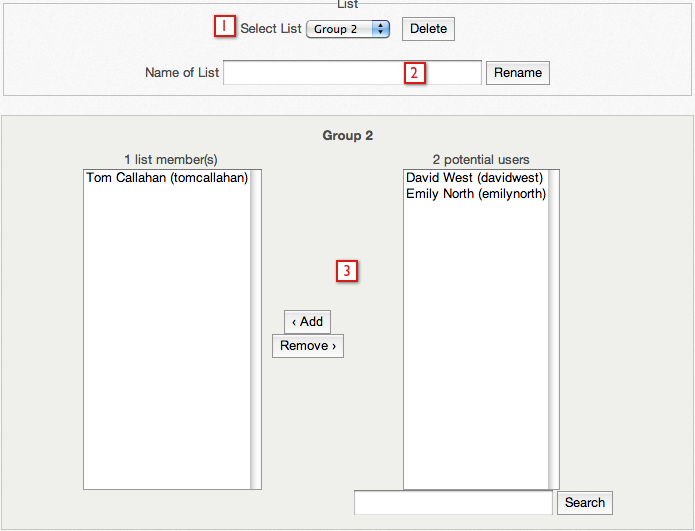
Once the new list is created users can be added to it.
- The new list is shown in the drop down menu of the image below. The list can be deleted by selecting the Delete button.
- The list can be renamed.
- Users from the class can be added to the list.
Once a list is created by a user, the user can send iMail to users in the list by selecting the list from the contacts screen:
- Select the "Show Lists" link. In the image it shows "Hide Lists" because the "Show Lists" link has already been selected.
- The list this user created is shown at the bottom of the users list on page 1.

Hidden Courses, Metacourses, etc.
Hidden blocks and hidden courses:The idea of iMail, in general, is to facilitate communication between members of courses. Thus, if the a user is enrolled in a course, she/he can see the inbox for that course and email other enrollees of the course, even if the block is not installed in the course, or if the block is hidden in the course.
However, if the course is 'hidden' or set to be not available to students, the students cannot see the inbox for that hidden course.
Metacourses:
When a meta-course is used, students see an inbox for the metacourse as well as the inbox for the child course they are enrolled in (if they are enrolled in a child course). This enables users to email students who are in their same child course specifically, as well as email students who are in the metacourse.