Data Hub 2.0
Importing Enrollment Information
Enrollment in Moodle is dependent on the context. If a user is enrolled as a student in a course, then they are given the role called 'student' - with permissions that are set for that role in Moodle's roles administration area, in the context of a course. A teacher could also be enrolled in a course - in this case they are given the role of teacher (with the permissions that are set for that role), in the context of a given course.Data Hub Basic enables you to set the roles of users via the import file, once you have created courses you can enroll users in these contexts. The most common types of enrollment are for students/learners and teachers/instructors.
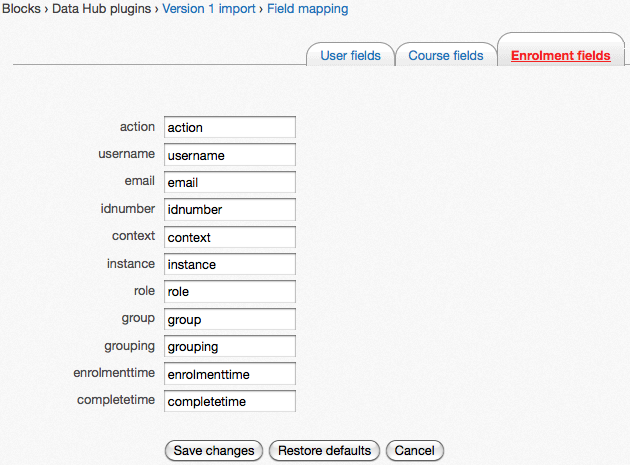
The Enrollment fields tab is where you can set the import parameters for enrollment fields. Go to the Settings block > Site Administration > Plugins > Blocks > Data Hub Plugins > Version 1 import > Field mapping. Then select the Enrollment fields tab.

If you make changes to any property values, be sure to save your changes with the Save changes button on the bottom of the screen. Use the Restore defaults button to restore the profile fields to their original state.
The properties that can be set via the enrollment file are listed below with brief descriptions:
| username: | The username for the user that will be assigned the role. |
| email: | The email for the user. |
| idnumber: | The idnumber for the user. |
| context: | Set the context for the role at system, user, course, or block context. For example, user A is added as a teacher in course A or parent A is added to the parent role of student A. |
| instance: | The name/shortname/username of the item you want to set the role at, e.g., the shortname of the course being updated. |
| role: | The short name for the role the enrollment gives the specified user in the specified context/course. To find the role short name go to the Site Administration block > Users > Permissions > Define roles and the short names of the roles are in the 3rd column of the chart, Short name. |
| group: | The name of the group the user should be added to. If the group doesn't already exist it will be created. |
| grouping: | The name of the grouping the user should be added to. If the grouping doesn't already exist it will be created. |
| enrolmenttime: | Enter the date when user enrollment should occur, the current date will be used if this field has no entry. The date format is DD/MM/YYYY. |
| completetime: | The date the user completes the course. The date format is DD/MM/YYYY. |
| action: | The actions for enrollment files are create or delete. The action "add" was used instead of "create" in Data Hub 1, it will still work in Data Hub 2.0. |
The required fields for enrollments are:
- role - role shortname
- username - of the user being assigned the role
- context - the role can be assigned at the system, user, course, or block level
- instance- name, username, shortname of the context the role is assigned in
- action - enter create or delete. The action "add" was used instead of "create" in Data Hub 1, it will still work with Data Hub 2.
Data Hub Actions
DH tells Moodle what needs to be done with imported data via the Actions column. The following actions can be performed for enrollments:
- create - add users to a role in a specific context, e.g., a course.
- delete - remove users from a role.

In the file the following actions are taking place. Row 2 is assigning Dave the student role in the course with shortname testcourse. Row 3 is deleting Debra from the student role in the course with shortname testcourse. Row 4 is assigning Chris to a counselor role in the user context for Dave. Row 5 is assigning Maria to a system role. Row 6 is assigning Hector to a course category role.
Select this link to download a csv copy of the file in the image. Note that the users, courses, and roles in the file have to be added to the site before this file could be processed correctly.
The Parent Role Use Case page of this book contains more information about setting up a parent role and assigning the parent role to a student user via an Data Hub upload.
Importing/Processing Data Hub Files
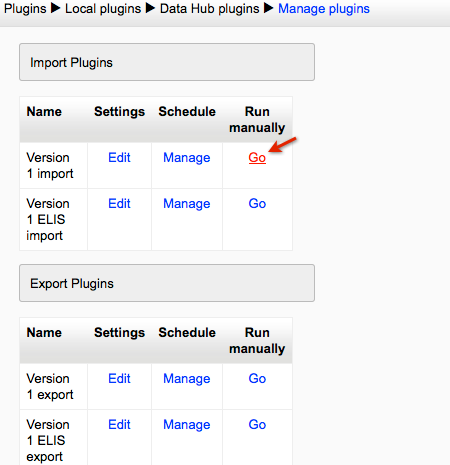
Enrollment files can be processed manually or can be scheduled to automatically process. Manual processing should be used for testing small files only, for more information about scheduling files to process select this link. To manually process files go to the Administration block > Site Administration > Plugins > Local plugins > Data Hub plugins > Manage Plugins. Under the Import Plugins section select the "Go" link in the Run manually column.

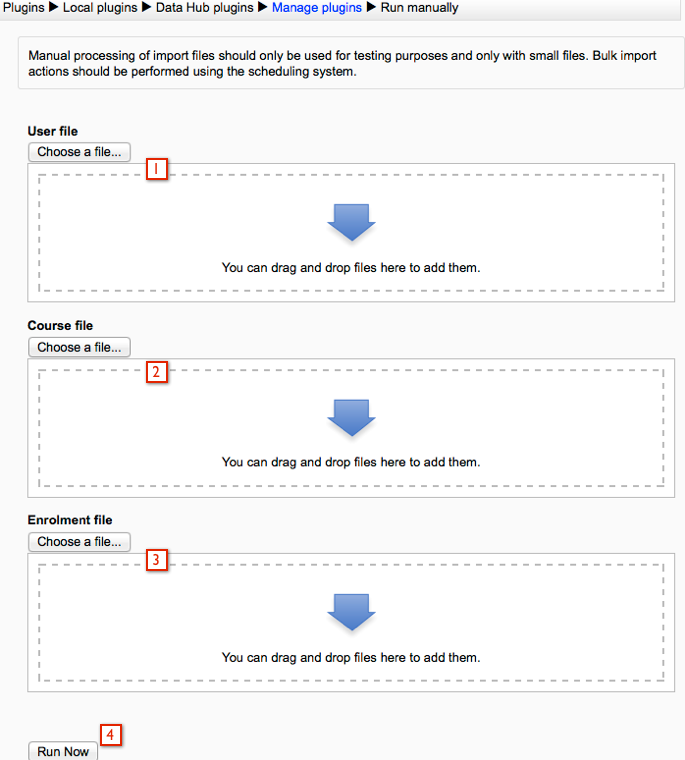
Next to (3) Enrollment file select the "Choose a file" button to select a file to upload or drag and drop a file onto the space. Then select the Run Now button.

Once the file is processed there will be a brief log message stating whether or not the file import was successful.
A complete log of all actions is kept in the logs file, as well as (optionally) emailed to an address or addresses each time the Data Hub script runs. You can also view/download logs by going to the Administration block > Site Administration > Reports > Data Hub logs link.
For information about scheduling imports to automatically process go to this page Importing/Processing Files.